OrchAId Protocols
Tetrazolium Chloride Testing and Imaging Protocol
The current version of this document aims to outline a replicable system to photograph stained orchid seeds, in order to curate an image database for model training purposes. However, it leaves some room to use this opportunity to update your viability records using your own scoring protocol.
1% Tetrazolium chloride (TZ) solution preparation
EN374 compliant gloves & EN166 compliant eye protection
1L amber bottle or 1L clear glass bottle and tin foil
Distilled water
Magnetic stirrer
pH meter
Procedure:
Dissolve 3.63 g of Potassium dihydrogen orthophosphate (KH2PO4) in 400 mL of distilled water in a glass beaker.
Dissolve 7.13 g of Disodium hydrogen orthophosphate dihydrate (Na2HPO4) in 600 mL of distilled water in a separate glass beaker.
When these stocks have completely dissolved, mix the two solutions in a 1 L glass container and add 10 g of 2,3,5-triphenyl tetrazolium chloride. Stir until all powder is dissolved and check that the pH of the solution is between 6 and 8.
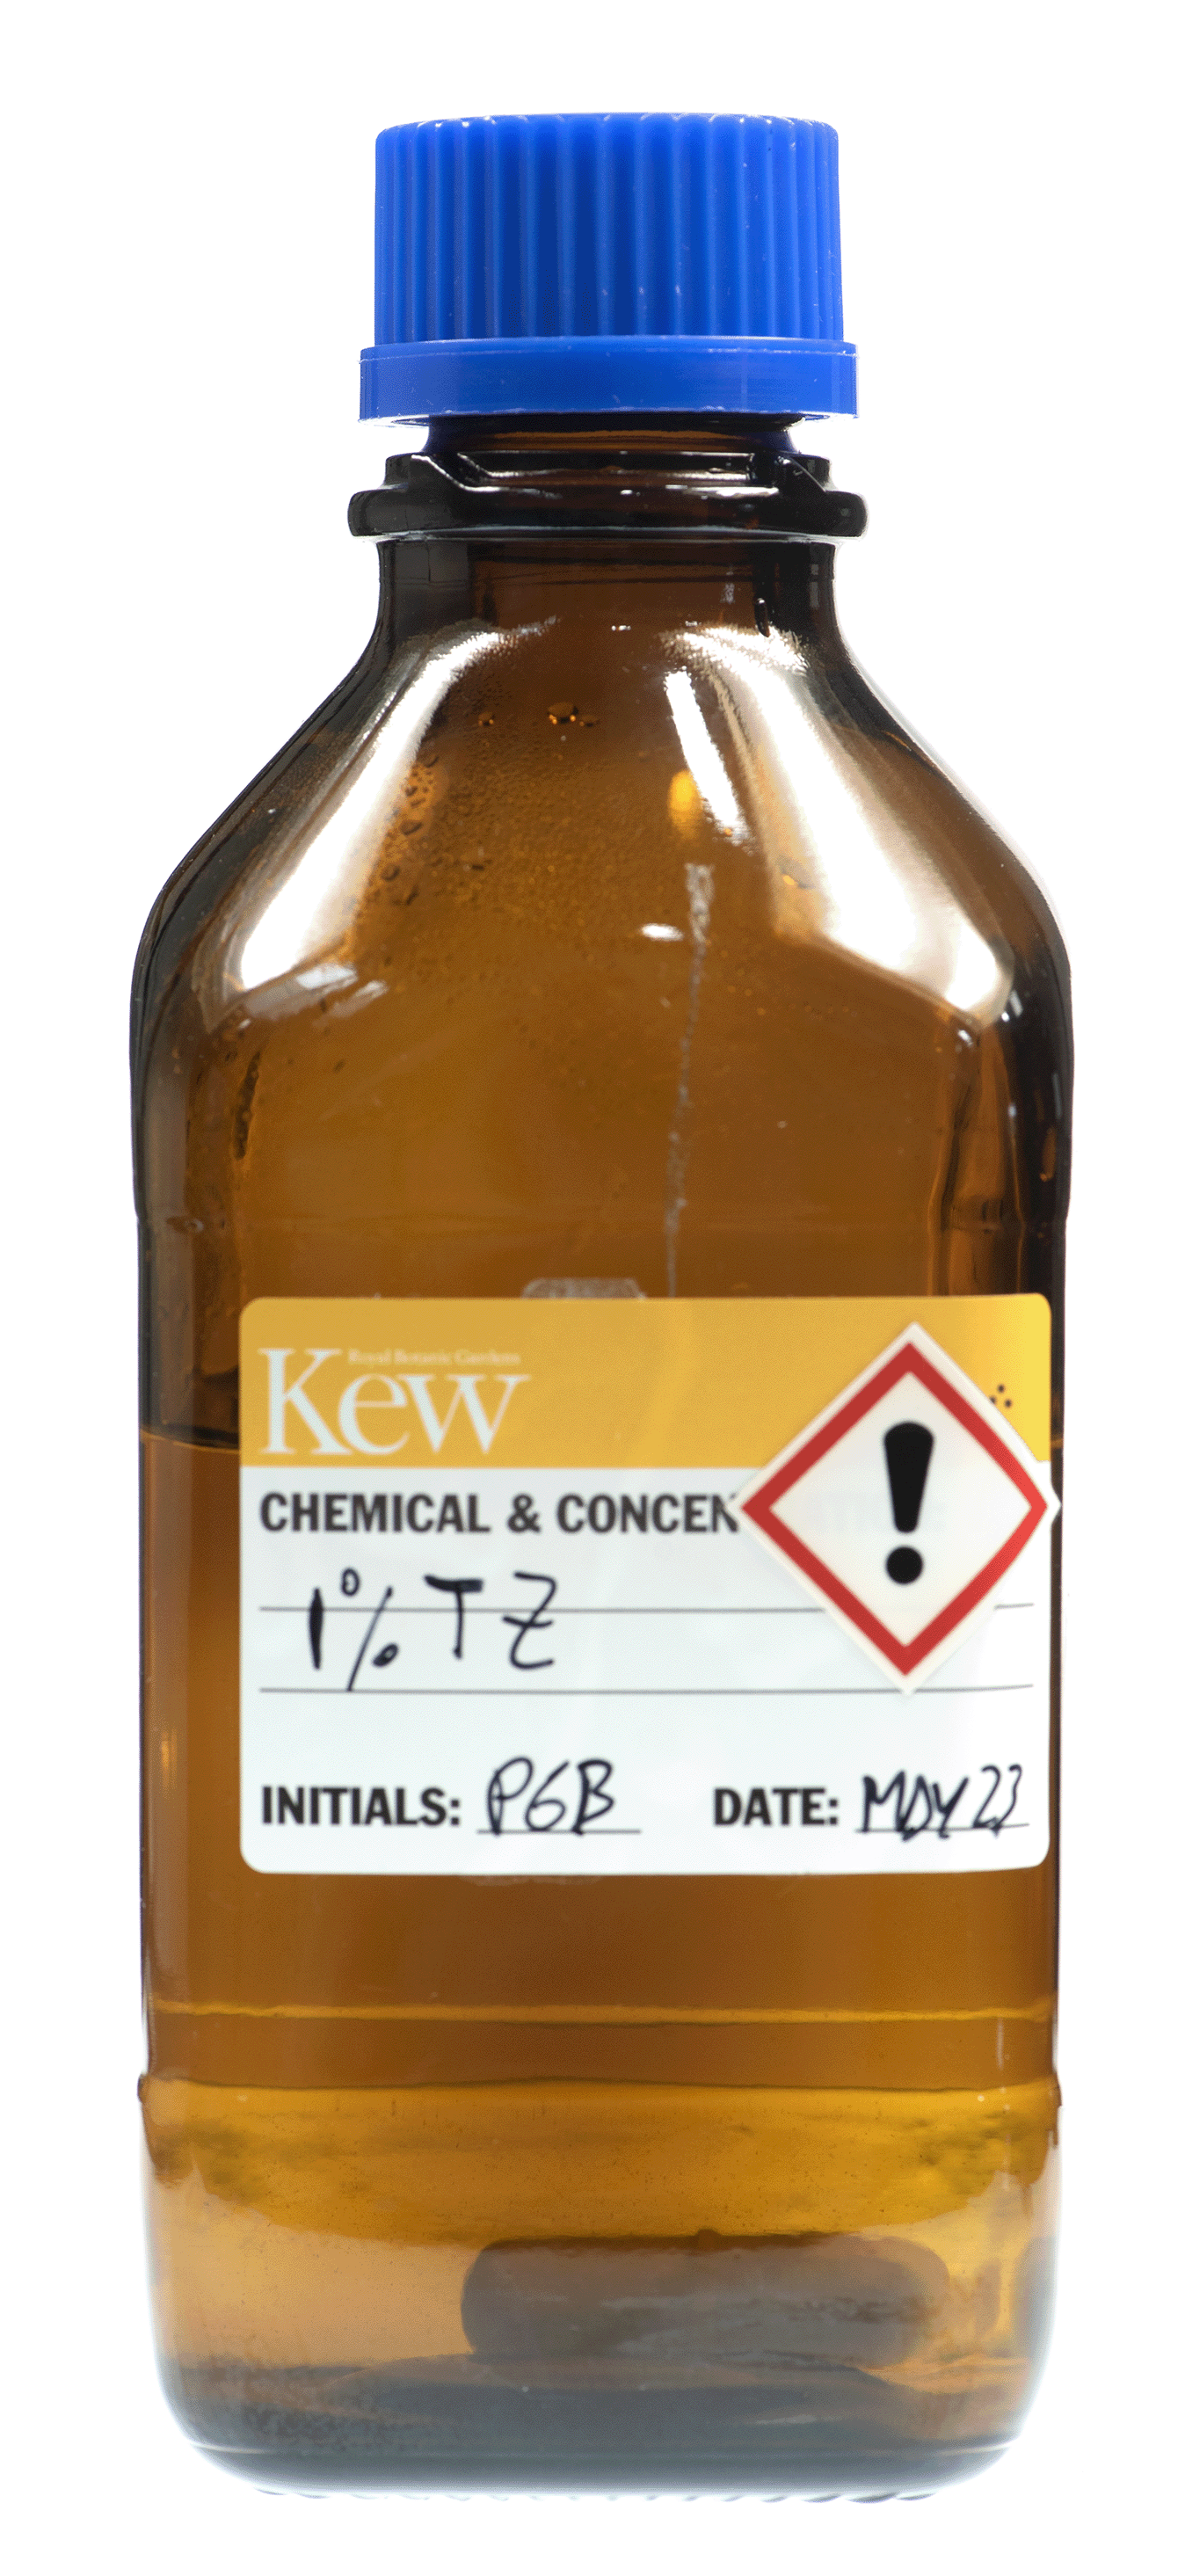
Label the bottle with your initials, contents, creation date and the appropriate chemical hazard symbol (or following your specific lab protocols) then store in the dark at 4 °C for not longer than 3 months. If you have used a clear glass bottle rather than an amber glass bottle, wrap the bottle in tin foil before storing.
Any reagent that develops a pink colour should be discarded
Orchid staining
5 cm diameter filter papers
Aluminium foil
Plastic covered paper clip
Pencil
1% TZ solution (see previous section)
Schott glass container 10-5 mL capacity
EN374 compliant gloves
Distilled water
Safety goggles (EN166)
Incubator at 30 °C
Procedure:
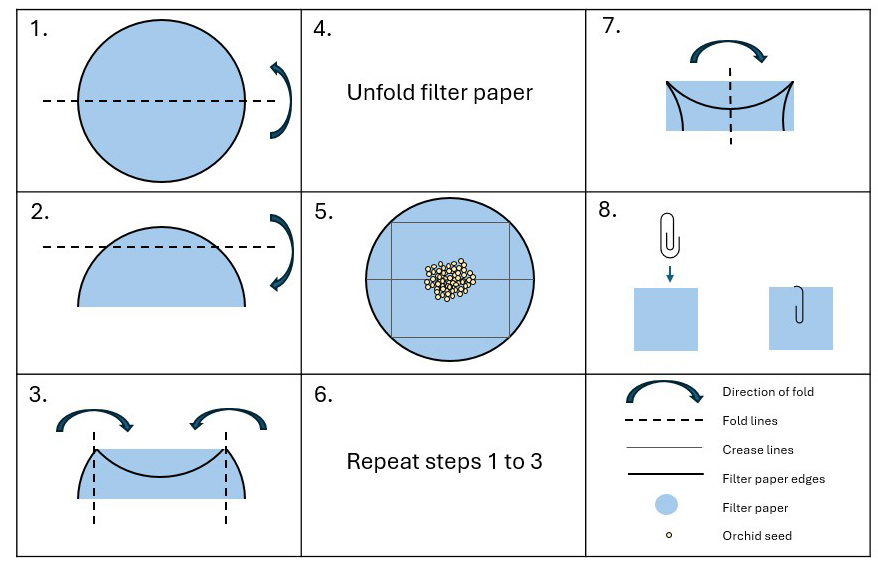
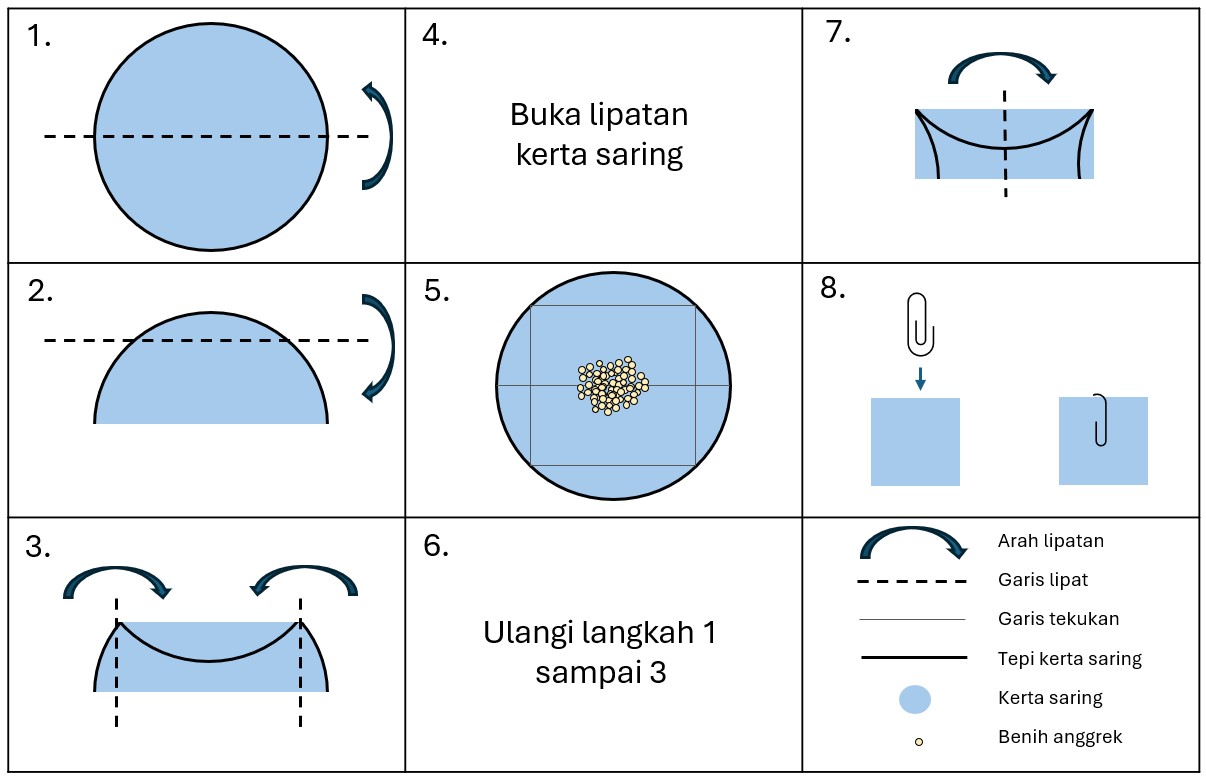
Fold a piece of filter paper to create a square packet following the diagram in Figure 2 (Steps 1 to 3)
Label the outside of the packet using a pencil with the seed accession or collection number (and the replicate number if appropriate).
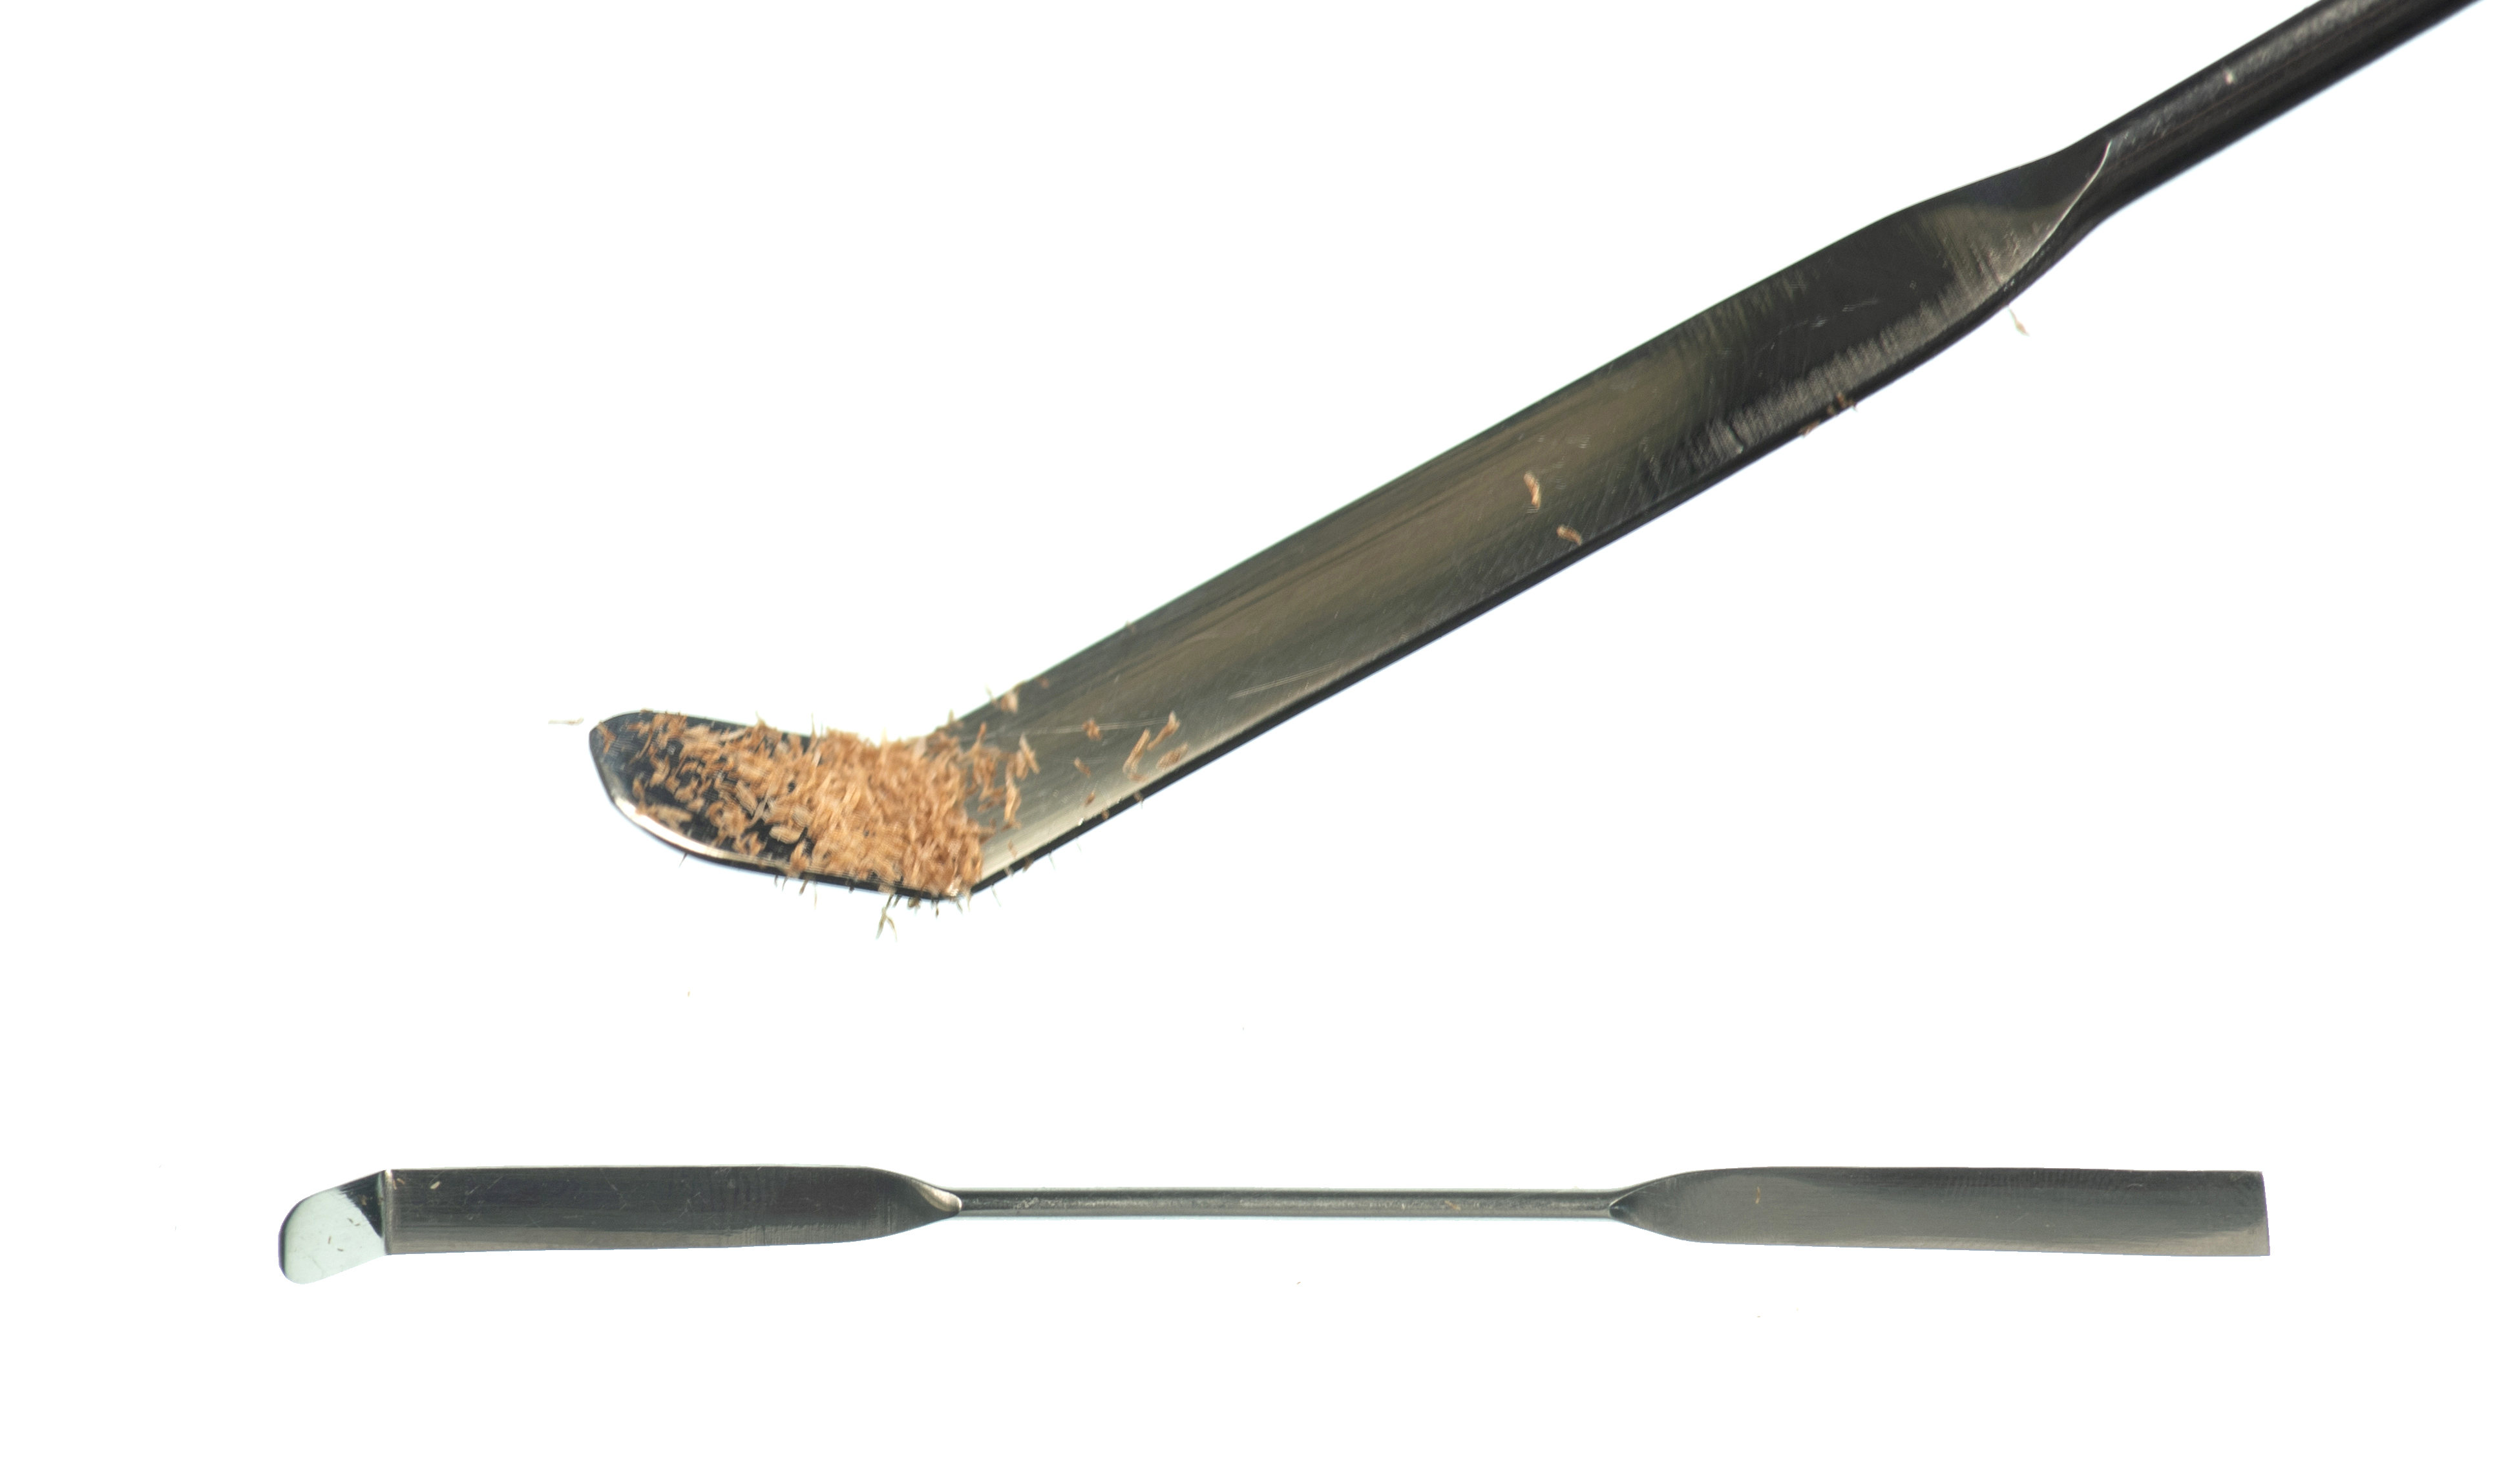
Unfold the packet and place less than 300 orchid seeds from a single collection in the centre of the packet (Figure 2, Step 4). The correct number of seeds can be determined using seed weight data and a precision balance when available, or estimated by scooping seeds with a spatula, as shown in Figure 3.
Re-fold the packet into a square and use a plastic covered paperclip to seal the packet closed. (Figure 2 Steps 5-7)
Submerge the packet in 1% TZ solution in a Schott bottle wrapped in a double layer of aluminium foil (Figure 2, Step 8), ensuring the packet is fully submerged.
Place in an incubator at 30 °C for a minimum of 24 hours, but up to 48 hours.
Microscope slide preparation for imaging
Thin tweezers
1% TZ solution
Glass microscope slide (frosted)
Coverslip
Pipette (1 mL)
EN374 compliant gloves
Safety goggles
Procedure:
Extract a packet from the TZ solution and carefully remove the paperclip without tearing the paper. Unfold the filter paper onto a flat surface.
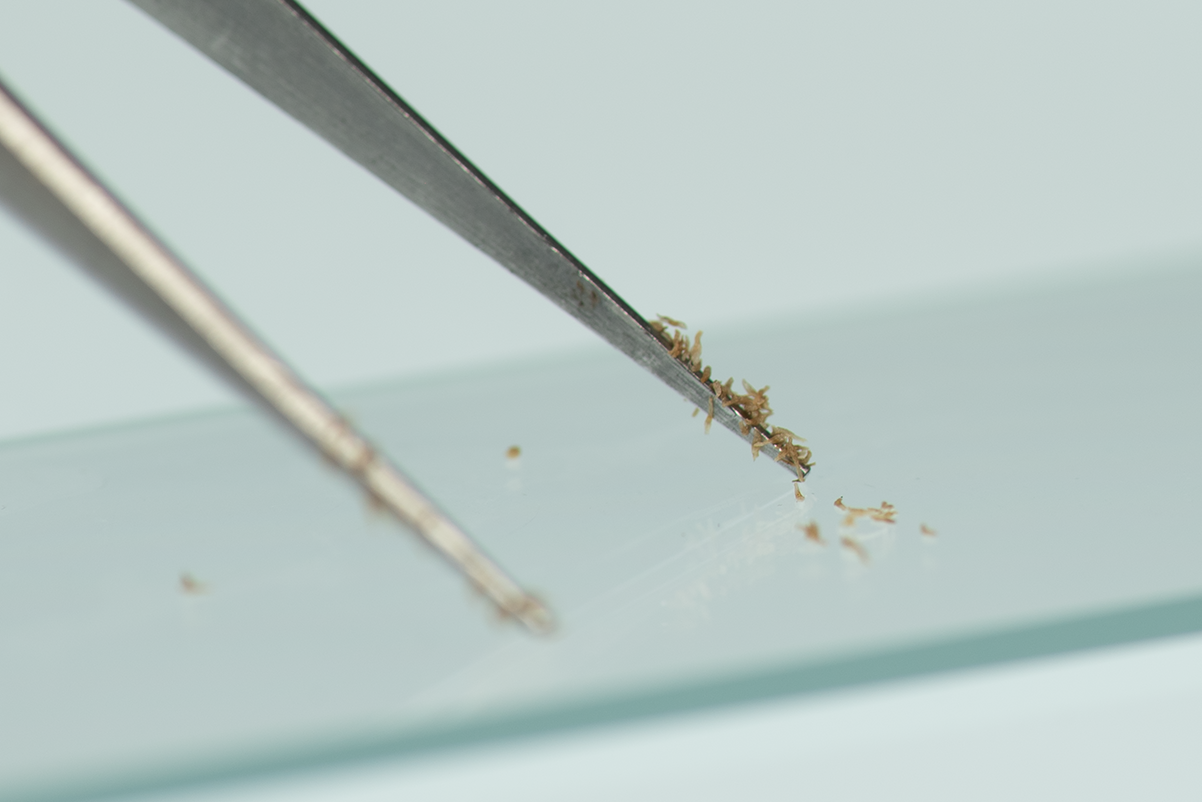
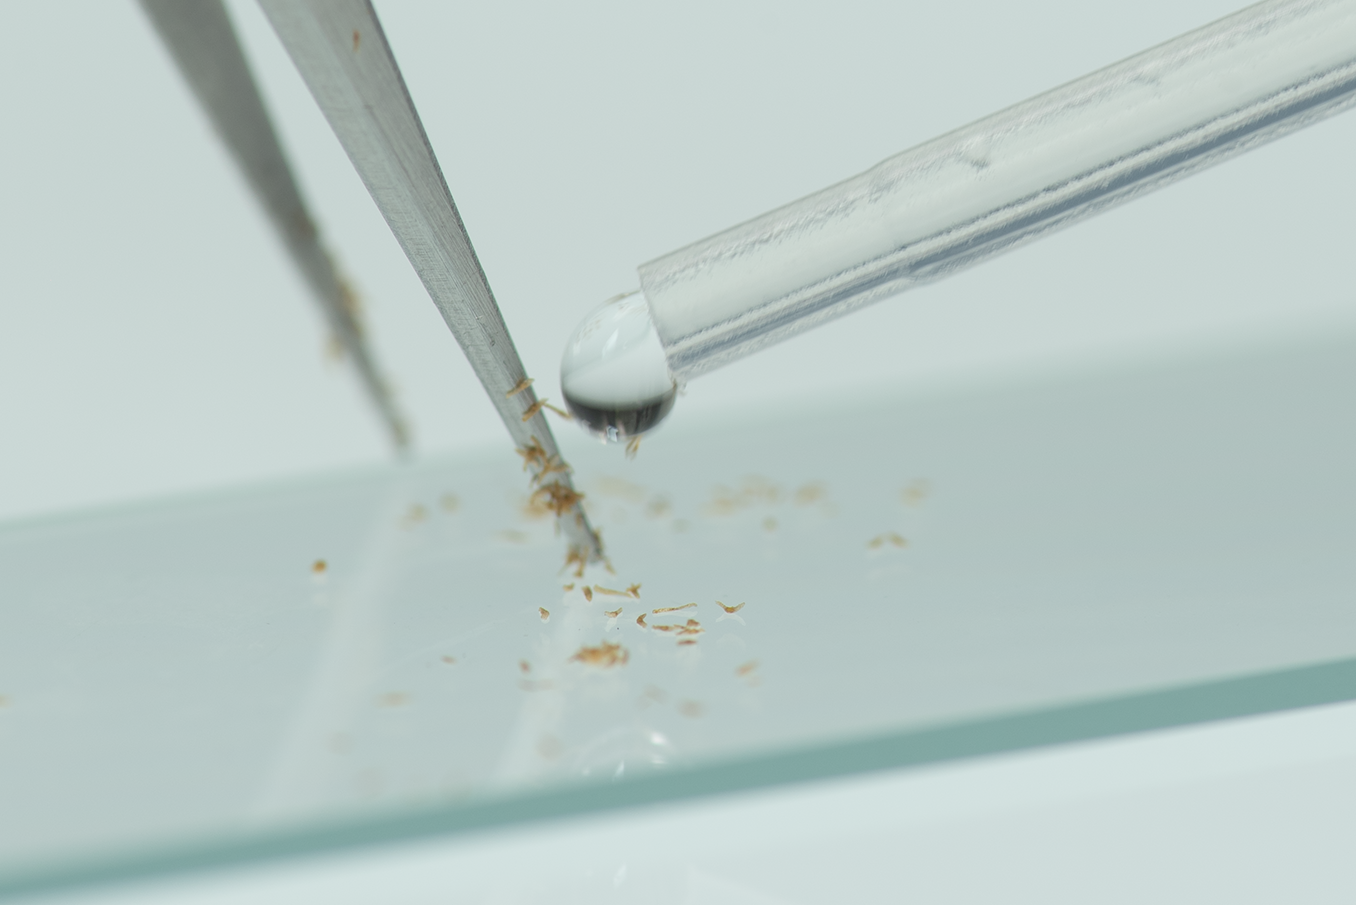
With a pair of thin tipped flat ended tweezers, gently scrape the seeds from the filter paper onto a microscope slide. While some seeds will make it into the microscope slide, it is likely most seeds will stay attached to the tweezer tips due to static (Figure 4). These can be easily removed by carefully using a drop of 1% TZ from a standard 1 mL transfer pipette onto the tip of the tweezers over the microscope slide (Figure 5). The optimal number of drops of 1% TZ a microscope slide can hold is between 2.5 and 3 (2 drops if square).
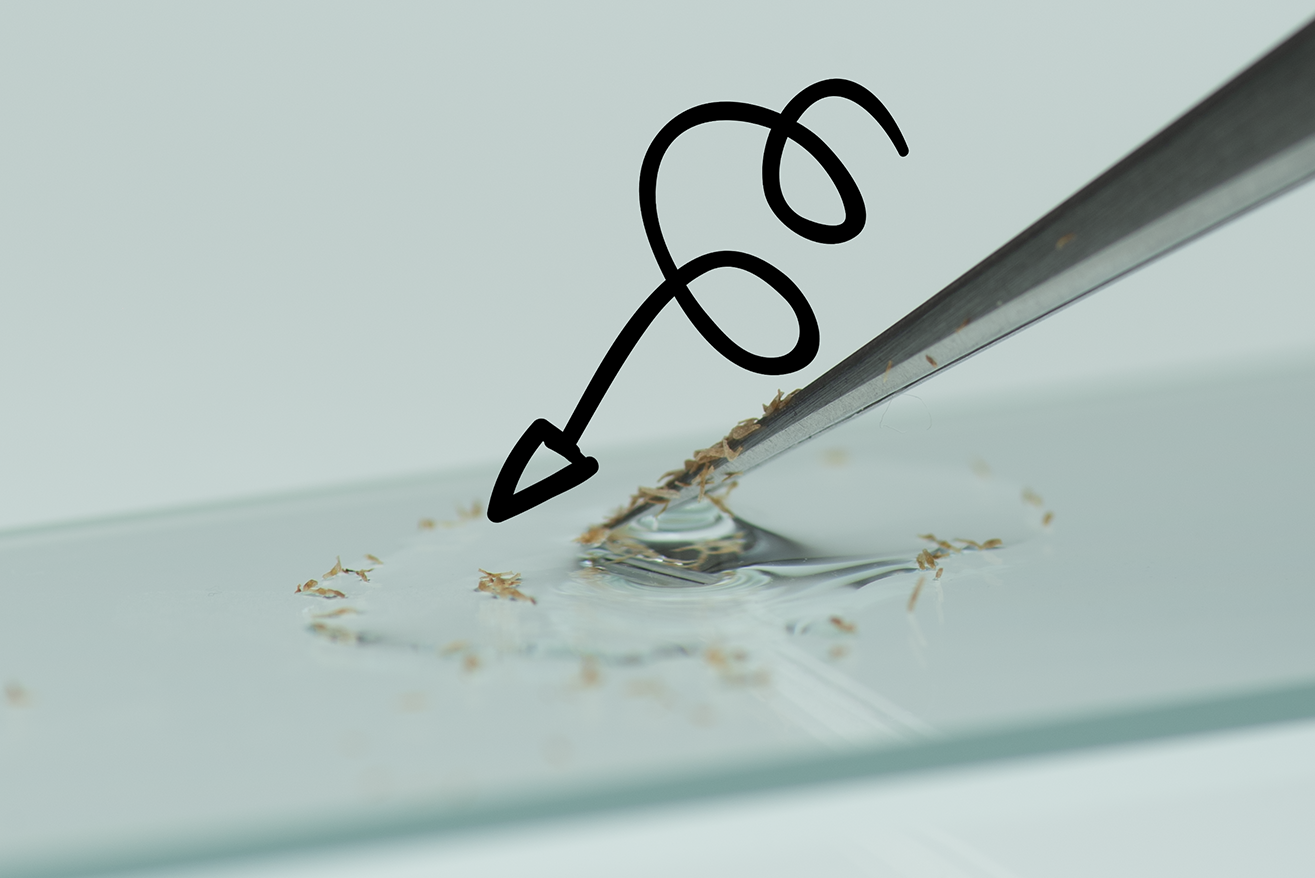
Swirl the tweezers in the TZ solution on the microscope slide surface to ensure all seeds make it onto the slide and try to separate any seed clusters that might have formed (Figure 6).
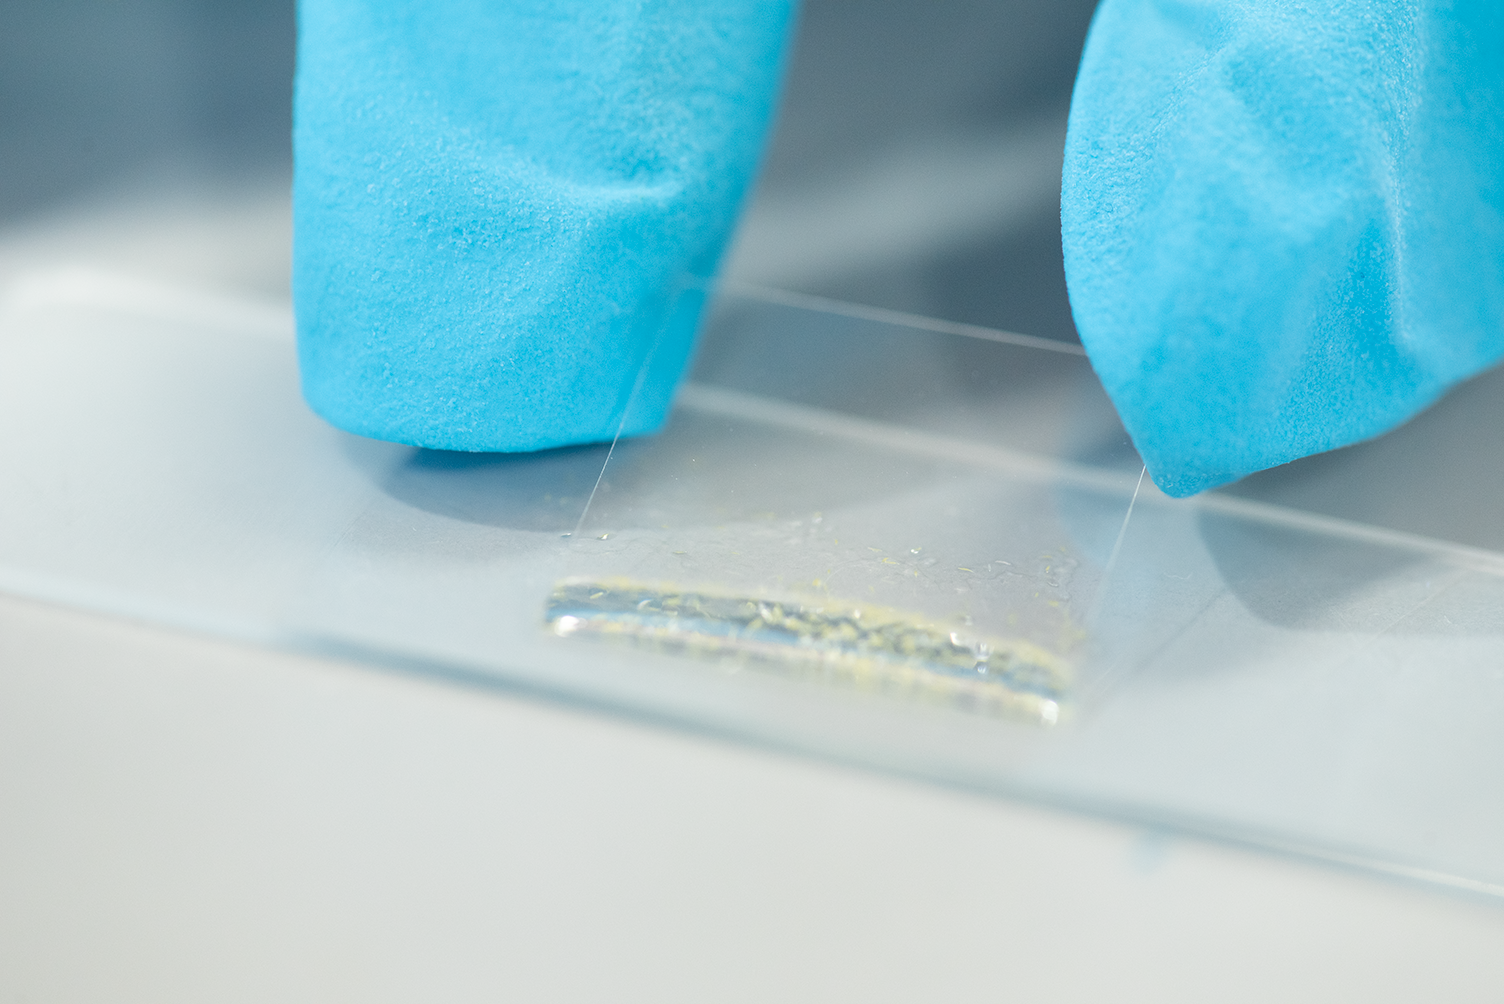
Finally, carefully position the coverslip avoiding seeds and liquid from falling from the slide (Figure 7, this is where the 3-drop 1% TZ limit comes in handy) while minimizing the number of air bubbles present. To do so, try to press the middle of the cover glass on top of the liquid instead of starting to cover from the borders.
Some bubbles may get trapped between the coverslip and the microscope slide, which could affect automated viability analysis. To minimize bubbles, position the 1 mL pipette near the gap between the coverslip and the slide, and slowly release some liquid to help dislodge the bubbles. This may cause some TZ solution to overflow onto the slide, but you can absorb the excess liquid with a towel.
Imaging set up and capture
Dino-Lite model AM4113T
Dino-Lite clamp e.g., RK-05
USB backlit surface (light box) with adjustable brightness
Laptop/Computer with a minimum of 2 USB ports
DinoCapture software version 2 or 3 installed
Procedure:
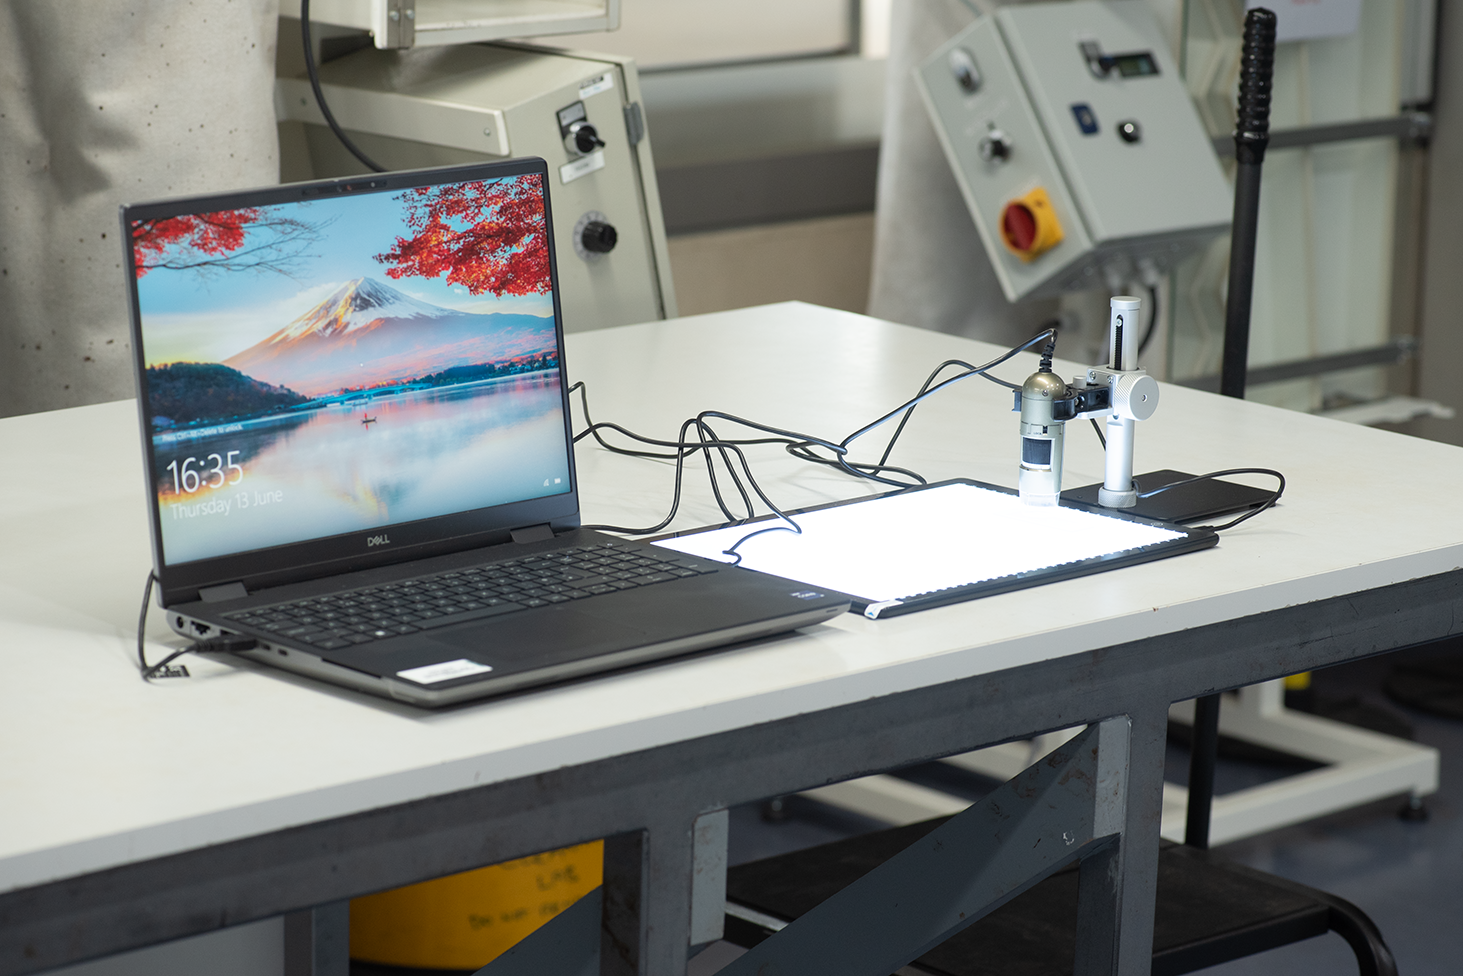
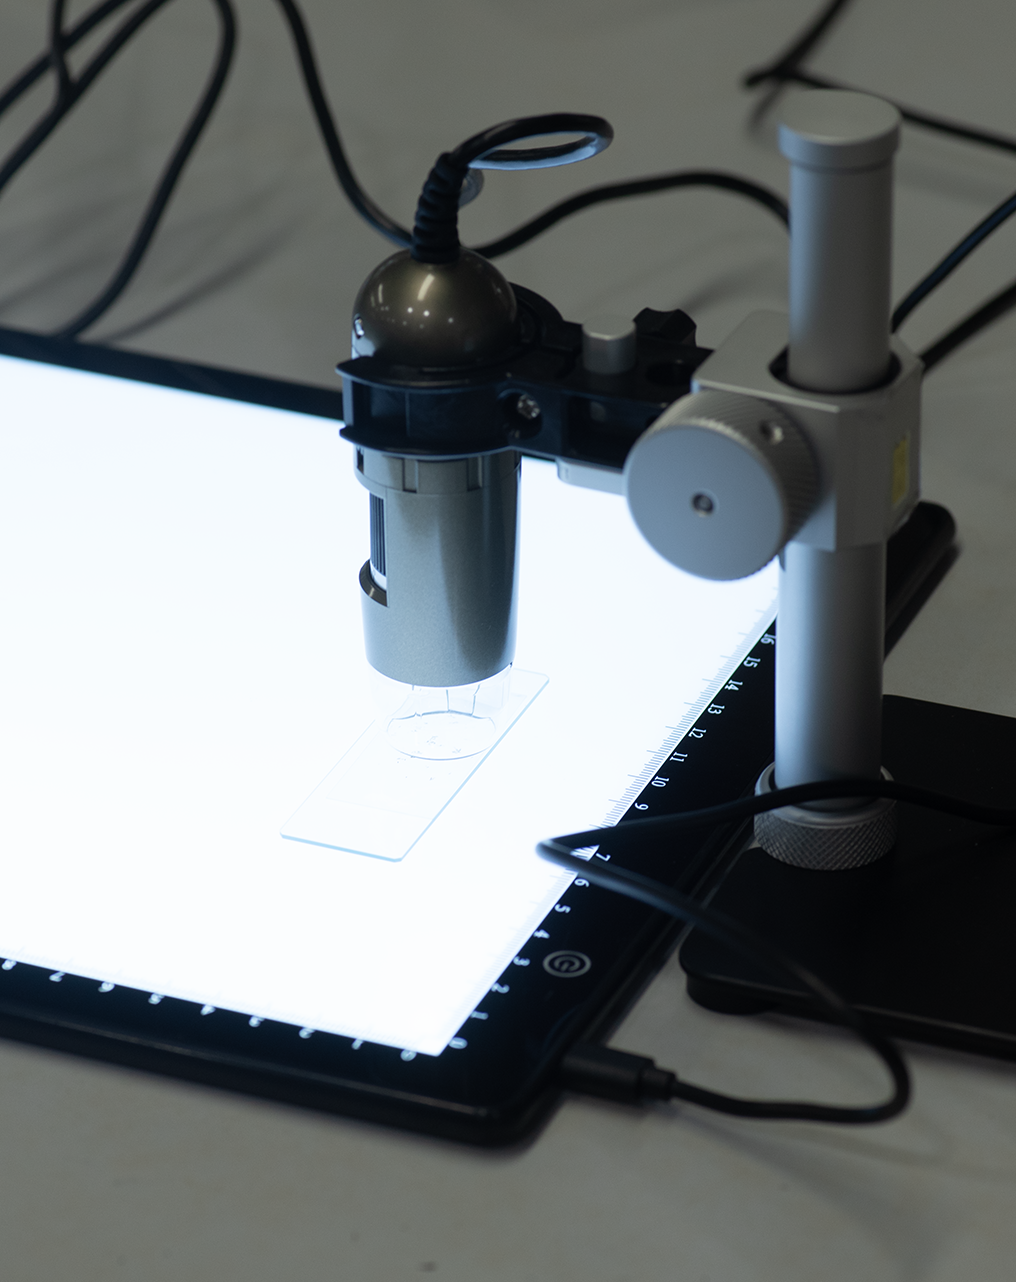
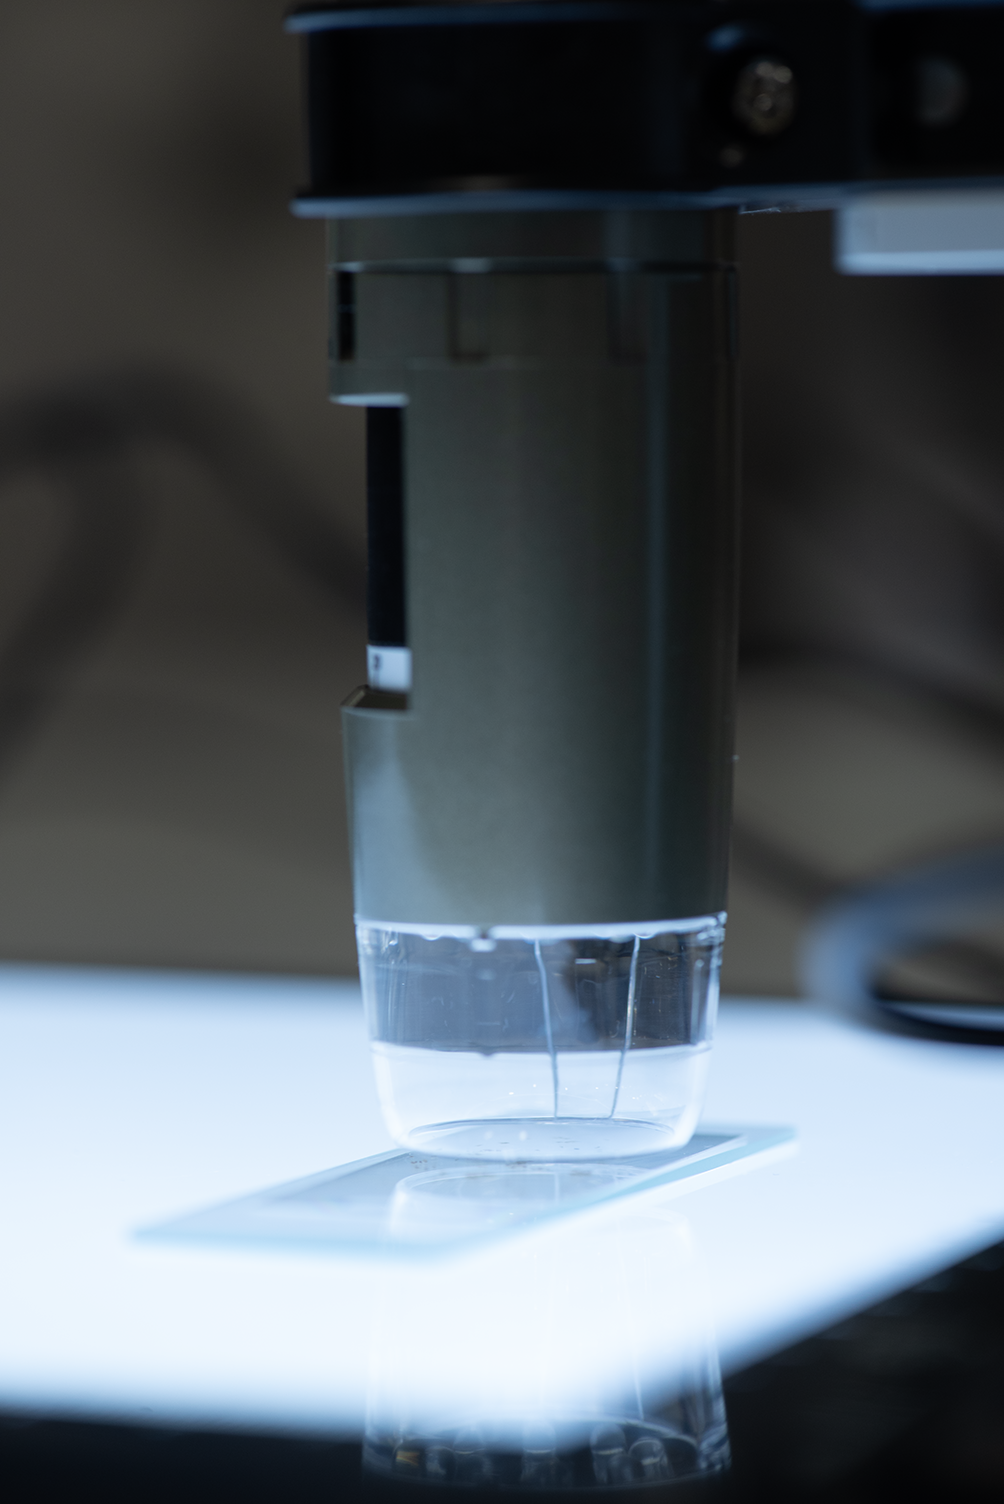
Use the clamp to hold the dino-lite in a vertical position above the lightbox, ensuring it can be lowered until it almost touches the surface of the light box leaving enough space for a microscope slide to fit under it with a few millimetres to spare (see Figure 8, Figure 9 and Figure 10).
Turn on the computer and connect both the Dino-Lite and the backlit base via USB ports to the computer.
Turn on the light box following the instruction manual for your specific make and model.
Open the DinoCapture software (version 2 or 3) and:
- Turn off the Dino-Lite LED lights
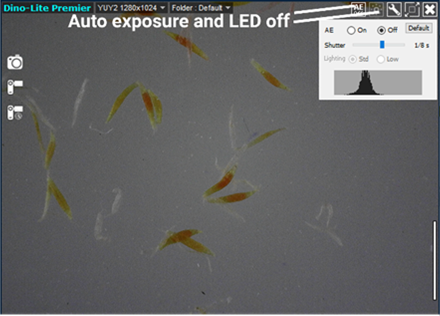
- Turn off the auto exposure function (Figure 11).
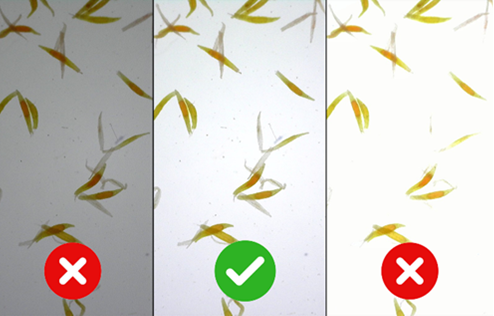
- Select a shutter speed between 1/15 and 1/60 - Play with these two shutter speed options and the light box brightens to obtain homogeneous white background without overexposing seed edges (Fig. 12).
Move the microscope slide around under the lens to maximise the number of seeds within focus, adjusting the brightness and focus as needed.
Take a picture by pressing the camera icon in the software live view window (Figure 11)
To save the image, right click on top of the image thumbnail in the left panel and “save as”. Remove all ticks from the “Imprint” section and select maximum image size and dpi. Save the image in .jpeg format.
Ensure file name contains all important information about the collection (species name, collection or accession number, replicate number (if applicable) and create a backup to ensure the information is not lost.
References
Seed viability testing using the Tetrazolium Chloride stain (Draft) - Millennium Seed Bank, Standard Operating Procedures 2.2
Methodology for epiphytic orchid seed viability test using Triphenyl Tetrazolium Chloride (TZ) - Millennium Seed Bank, Standard Operating Procedures 2.21
Sigma’s 2,3,5-Triphenyltetrazolium chloride Safety Data Sheet | SDS
Ireo dingana arahina amin’ny fanaovana fitsapana sy fitarafana amin’ny Chlorure de tétrazolium
Ny tahadikan’ity antontan-taratasy ity dia natao mba hanolorana rafitra azo averina atao hakana sary ny voan’ny orkide voaloko, mba hahazoana mandrafitra angon-tsary hatao lasitra enti-manofana. Na izany aza dia manome toerana hahafahanao manavao ny firaketanao momba ny fahavelomana izay nalainao tamin’ny dingana fandrefesanao manokana izany.
Fikarakarana fangarona Chlorure de tétrazolium (TZ) 1%
Fonon-tanana fiaro manaraka ny fenitra EN374 & solomaso fiaro manaraka ny fenitra EN166
Tavoahangy mavo 1L na Tavoahangy mazava 1L sy taratasy vita amin’ny alimo
Rano voadio
Fanafangaroana mandeha amin’ny andriamby
Fandrefesana pH
Drafitra arahana:
Levonina ao anaty rano voadio 400 mL amin’ny vera lehibe ny dihydrogénophosphate de potassium (KH2PO4) 3.63g.
Levonina ao anaty rano voadio 600 mL amin’ny vera lehibe hafa ny hydrogénophosphate de disodium (Na2HPO4) 7.13g.
Rehefa levona avokoa ireo singa ireo dia atambatra ao anaty tavoahany 1L ireo fangaro ireo ary androtsahana chlorure de 2,3,5-tripphényltétrazolium 10 g. Haroharoy mandrapaha-levona tanteraka ireo vovon-javatra ary jereo fa tokony ho eo anelanelan’ny 6 sy 8 ny pH an’ilay fangaro.
Soraty amin’ny etikety eo amin’ilay tavoahangy ireo litera voalohany amin’ny anaranao, ny anaran’ilay fangaro, ny daty nanamboarana azy ary marika maneho ny loza simika mifanaraka aminy (na izay mifanaraka amin’ireo dingana tsy maintsy arahina manokana ao amin’ny toeram-piasanao), avy eo dia atokany amin’ny toerana maizina amin’ny maripana 4°C mandritra ny 3 volana raha ela indrindra. Raha toa ka tavoahangy mazava no nampiasainao ho solon’ny tavoahany mavo dia sarony amin’ny taratasy vita amin’ny alimo mialohan’ny hanokanana azy.
Ny vokatra simika rehetra izay manova ny lokon’ny fangaro ho mavo kely dia tsy maintsy ariana avokoa
Fandokoana ny orkide
Taratasy fanivanana mirefy 5cm savaivony
Taratasy vita amin’ny alimo
Traombaonina mifono plastika
Penisilihazo
Fangarona TZ 1% (jereo ny fizarana teo aloha)
Vera Schott lehibe mahazaka 10-15 mL
Fonon-tanana manaraka ny fenitra EN374
Rano voadio
Solomaso fiaro (manaraka ny fenitra EN166)
Fitaovana mitana hafanana amin’ny maripana 30°C
Drafitra arahana:
Aforeto ny taratasy fanivanana mba hanome fonosana efa-joro araky ny hita eo amin’ny Figure 14 (dingana 1 ka hatramin’ny 3).
Soraty amin’ny pensilihazo eo ivelan’ilay fonosana ny laharan’ny fandraisana na ny fanangonana ny voa (ary ny laharana taha-dika raha misy).
Sokafy ilay fonosana ary apetraho eo afovoany ny voan’ny Orkide miisa latsaky ny 300 avy amin’ny vokatra iray (Figure 14, Dingana faha-4). Azo fantarina ny isa marin’ireo voa amin’ny alalan’ny fampiasana fampahalalana mifandray amin’ny lanjan’ny voa sy fandanjana raha misy, na tombanana amin’ny alalan’ny fandraofana ireo voa araky ny hita eo amin’ny Figure 15.
Avereno aforitra ho efajoro ilay fonosana ary mampiasa traombaonina mifono plastika mba hamehezana azy tsy hivaha (Figure 14, Dingana 5-7).
Atsobohy ao anaty vera Schott lehibe misy fangaro TZ 1% mifono taratasy vita amin’ny alimo roa sosona ilay fonosana (Figure 14, Dingana faha-8), aoka ho azonao antoka fa miroboka tanteraka ilay fonosana.
- Apetraho ao anaty fitaovana mitahiry hafanana amin’ny maripana 30°C mandritra ny 24 ora raha kely indrindra saingy tsy mihoatra ny 48 ora.
Fanomanana ny takelaky ny mikraoskaopy ho amin’ny fangalana sary
Fiavotra manify
Fangarona TZ 1%
Talelaka fitaratra manify amin’ny mikraoskaopy (tsy mangarahara)
Rakony (lamelle)
Pipety (1 mL)
Fonon-tanana manaraka ny fenitra EN374
Solomaso fiaro
Drafitra arahana:
Tsoahy avy ao anatin’ilay fangarona TZ ny fonosana ary esory moramora ny traombaonina, tandremo tsy ho rovitra ilay taratasy. Sokafy ary velaro ilay taratasy fanivanana.
Amin’ny alalan’ny fiavotra manify fisa-doha dia alaivo moramora ireo voa avy eo amin’ilay taratasy fanivanana ary apetraho eo amin’ilay takelaka fitaratra manify amin’ny mikraoskaopy. Na dia mety mipetraka eo amin’ilay takelaka fitaratra aza ny voa sasany, ny ankabeazany kosa dia hiraikitra amin’ilay fiavotra noho ny hery manintona (Figure 16). Azo alana mora foana izany amin’ny fampiasana TZ 1% in-dray mitete amin’ny pipety 1 mL avy eo amin’ny lohan’ilay fiavotra ho eo amin’ilay takelaky ny mikraoskaopy (Figure 17). Ny habetsaky ny TZ 1% zakan’ny takelaky ny mikraoskaopy iray dia eo anelanelan’ny 2.5 sy 3 mitete eo ho eo (2 mitete raha toa efajoro).
Ahetsiketseho ao anatin’ilay fangarona TZ ilay fiavotra eo ambonin’ilay takelaky ny mikraoskaopy mba hahazoana toky fa tafapetraka eo amin’ilay takelaka avokoa ireo voa ary ezaho ny manasaraka ireo voa izay mety mivangongo (Figure 18).
Farany dia apetraho moramora ilay rakony hialana amin’ny mety hirarahan’ireo voa sy ranon-javatra ivelan’ilay takelaka (Figure 19, eto no mahatonga ilay fetra 3 mitete ana TZ 1% voalaza teo aloha ho tena zava-dehibe) ary ezaho ferana ireo tapoaka miforona. Mba hanaovana izany dia ezaho ny manery moramora ny ivon’ilay rakony fa tsy atomboka avy amin’ny sisiny rehefa manarona azy.
Ireo tapoaka sasany dia mety hiangona ao anelanelan’ilay rakony sy ilay takelaky ny mikraoskaopy, ka mety hisy fiantraikany amin’ny famakafakana mandeha ho azy amin’ny fahavelomana. Mba hisoroana ny tapoaka be loatra dia apetraho eo akaikin’ny elanelan’ilay rakony sy ilay takelaka fitaratra ny pipety 1 mL ary andraraho ranon-javatra moramora mba hanalana ireo tapoaka. Mety hahatonga ilay fangarona TZ hiraraka ivelan’ilay takelaka izany, saingy azonao fafana amin’ny lamba famafana fotsiny ny ranon-javatra mihoatra.
Fikirakirana sy fakana ireo sary
Modely Dino-Lite AM4113T
Fametahana Dino-Lite, RK-05 ohatra
Latabatra misy jiro mandeha amin’ny USB (boaty manazava) miaraka amin’ny hazavana azo hovaina
Solosaina misy USB 2 farafahakeliny
Rindrambaiko DinoCapture kinova 2 na 3 anaty solosaina
Drafitra arahana:
Ampiasao ilay fametahana mba hihazonana ilay Dino-Lite amin’ny adavany eo ambonin’ilay boaty manazava; aoka ho azo ampidinina mora foana izany ary tsy hajanona raha tsy efa hila hikasika ilay boaty manazava, mamela elanelana kely hampidirana nytakelaky ny mikraoskaopy miampy milimetatra vitsy (jereo ny Figure 20, Figure 21 ary ny Figure 22).
Velomy ny solosaina ary ampifandraiso aminy amin’ny alalan’ny USB ny Dino-Lite sy ilay boaty manazava.
Areheto ilay boaty manazava ary araho ny toromarika mifanaraka amin’ny marika sy ny modely ampiasainao.
Sokafy ny rindrambaiko DinoCapture (kinova 2 na 3) ary:
- Piho ny jiro LED ilay Dino-Lite
- Vonoy ny fanazavana mandeha ho azy (?@fig-exposuremg).
- Safidio ny hafainganam-pisokafan’ny lalan’ny hazavana amin’ny fakan-tsary ho eo anelanelan’ny 1/15 sy 1/60 - ampifandimbiaso ireo hafainganam-pisokafana ireo miaraka amin’ny hazavan’ny boaty manazava mba ahazoana sary fotsy mazava, tsy mampiharihary loatra ny sisin’ny voa (Fig. 12).
Akisaho ho eo ampototry ny hidinin’ny fakan-tsary ilay takelaky ny mikraoskaopy mba hampitomboana ny isan’ny voa hita mazava tsara, ary ovay araka izay maha mety azy ny hazavana sy ny fifantohan’ny sary.
Alaivo ny sary amin’ny fikitihina ny sary fakan-tsary eo amin’ny efijery eo amin’ilay rindrambaiko (?@fig-exposuremg)
Mba hahafahana mitahiry ny sary dia ataovy click droit eo amin’ny sary kely eo amin’ny tontonana havia ary kitiho ny save as (enregistrer sous). Esory avokoa ireo marika amin’ireo efajoro kely eo amin’ny imprint (Impression) ary safidio ny habe sy ny hatsaran’ny sary avo indrindra. Tehirizo amin’ny endriny .jpeg ny sary.
Aoka ny anaran’ilay raki-tahiry mba hahitana ireo famahalalana rehetra momba ilay angona (anarana, angona na laharan’ny angona, laharana tahadika (raha misy) ary mamoròna dika mitovy mba hitandrovana ireo fampahalalana tsy ho very. jery akaiky ny rindrambaiko DinoCapture. Maneho tokon-tsary miloko volon-davenona izany miaraka amin’ny fangarona voana orkide misy pentina sy tsy misy pentina. Eo amin’ny sisiny havanana ambony amin’ilay sary dia ahitana marika efajoro dimy milahatra. Ny voalohany dia ahitana ny soratra ’AE’ ary ny faharoa kosa dia sary masoandro. Ireo marika roa dia samy ahitana tsipika sy teny Auto exposure and LED off (Hazavana mandeha ho azy sy jiro LED, tsy mandeha) misoratra eo amin’ny sary.” }
Fanovozan-kevitra
Seed viability testing using the Tetrazolium Chloride stain (Draft) - Millennium Seed Bank, Standard Operating Procedures 2.2
Methodology for epiphytic orchid seed viability test using Triphenyl Tetrazolium Chloride (TZ) - Millennium Seed Bank, Standard Operating Procedures 2.21
Sigma’s 2,3,5-Triphenyltetrazolium chloride Safety Data Sheet | SDS
Pruebas con cloruro de tetrazolio y protocolo de obtención de imágenes
La versión actual de este documento tiene como objetivo describir un sistema que pueda reproducirse de manera exacta para fotografiar semillas de orquídeas tintadas, con el fin de crear una base de datos de imágenes destinada al entrenamiento del modelo. Sin embargo, esto deja cierto margen para poder aprovechar la oportunidad de actualizar sus registros de viabilidad utilizando su propio protocolo de puntuación.
Preparación de una solución de cloruro de tetrazolio (TZ) al 1 %
Guantes que cumplen con la normativa EN374 y protección ocular que cumple con la normativa EN166
Botella ámbar de 1 litro o botella de vidrio transparente de 1 litro y papel de aluminio
Agua destilada
Agitador magnético
Medidor de pH
Procedimiento:
Disuelva 3,63 g de ortofosfato de dihidrógeno potásico (KH2PO4) en un vaso de precipitados con 400 ml de agua destilada.
Disuelva 7,13 g de ortofosfato disódico de hidrógeno dihidrato (Na2HPO4) con 600 ml de agua destilada en un vaso de precipitados diferente.
Cuando estas soluciones se hayan disuelto por completo, mézclelas en un recipiente de vidrio de 1 litro y añada 10 g de cloruro de 2,3,5-trifeniltetrazolio. Remueva hasta que todo el polvo se haya disuelto y compruebe que el pH de la solución esté entre 6 y 8.
Etiquete la botella con sus iniciales, el contenido, la fecha de creación y el correspondiente pictograma de peligro químico (o siga los protocolos específicos de su laboratorio) y guárdela en un lugar oscuro a 4 °C durante un máximo de 3 meses. Si ha utilizado una botella de vidrio transparente en lugar de una de vidrio ámbar, envuélvala con papel de aluminio antes de guardarla.
Todo reactivo que adquiera un color rosado debe desecharse.
Tinción de orquídeas
Papeles de filtro de 5 cm de diámetro
Papel de aluminio
Sujetapapeles recubierto de plástico
Lápiz
• Solución de tetrazolio TZ al 1 % (consultar apartado anterior)
Frasco de vidrio Schott de 10-15 ml de capacidad
Guantes que cumplen con la normativa EN374
Agua destilada
Gafas protectoras (EN166)
Incubadora a 30 °C
Procedimiento:
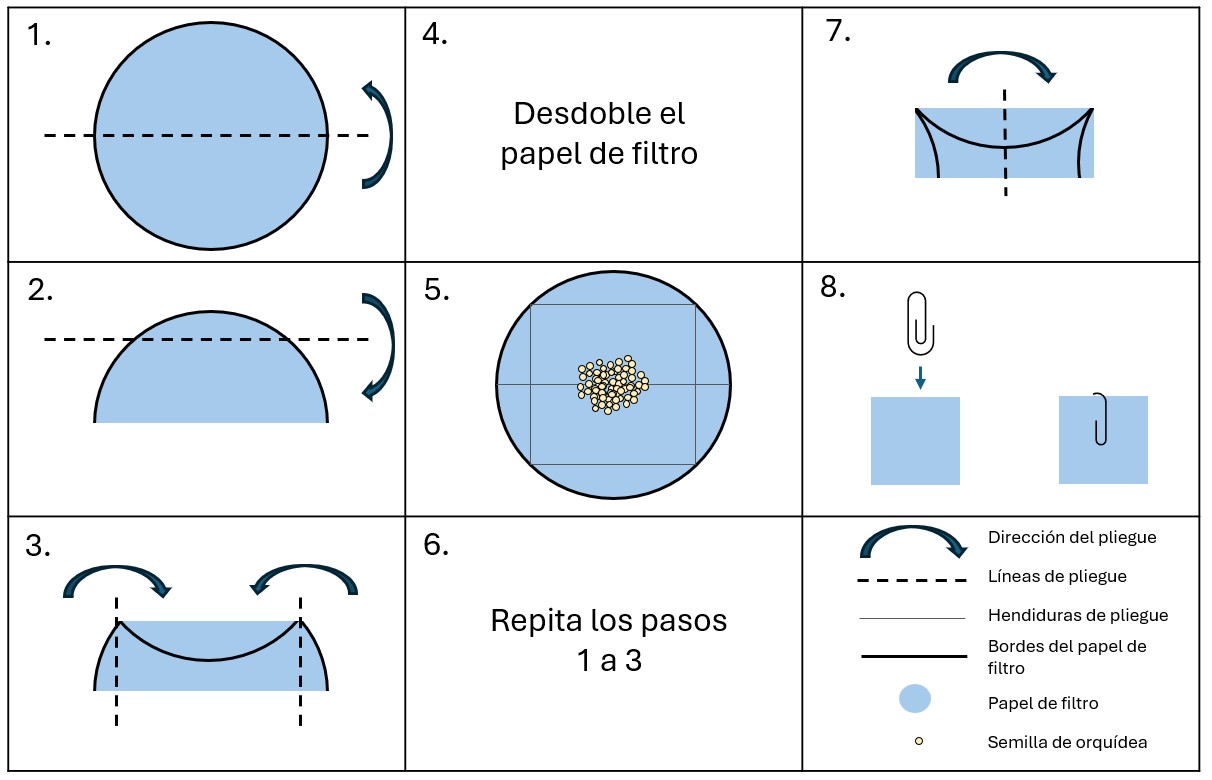
Doble un trozo de papel de filtro para crear un sobrecito cuadrado siguiendo el dibujo de Figure 25 (Pasos 1 a 3).
Etiquete el exterior del sobrecito con un lápiz indicando el número de accesión o de colección de las semillas (y el número de réplica, si procede).
Despliegue el sobrecito y coloque menos de 300 semillas de orquídea de una única colección en el centro del mismo (Figure 25, paso 4). El número correcto de semillas se puede determinar utilizando los datos sobre el peso de las semillas y una balanza de precisión, si se dispone de ella, o se puede calcular recogiendo las semillas con una espátula, tal y como se muestra en la Figure 26.
Vuelva a doblar el sobrecito en forma de cuadrado y utilice un sujetapapeles recubierto de plástico para cerrarlo (Figure 25, pasos 5-7).
Sumerja el paquete en una solución de tetrazolio TZ al 1 % en un frasco Schott envuelto en una doble capa de papel de aluminio (Figure 25, paso 8), asegurándose de que el paquete esté completamente sumergido.
Colóquelo en una incubadora a 30 °C durante un mínimo de 24 h y un máximo de 48 h.
Preparación del portaobjetos del microscopio para la obtención de imágenes
Pinzas finas
Solución de tetrazolio TZ al 1 %
Portaobjetos del microscopio de vidrio (esmerilado)
Cubreobjetos
Pipeta (1 ml)
Guantes que cumplen con la normativa EN374
Gafas protectoras
Procedimiento:
Extraiga un paquete de la solución de tetrazolio TZ y retire con cuidado el sujetapapeles sin romper el papel. Extienda el papel de filtro sobre una superficie plana.
Con unas pinzas de punta plana y fina, raspe suavemente las semillas del papel de filtro y colóquelas en el portaobjetos del microscopio. Algunas semillas se depositarán en el portaobjetos, sin embargo, la mayoría quedarán adheridas a la punta de las pinzas debido a la electricidad estática (Figure 27). Para despegarlas aplique con cuidado una gota de tetrazolio TZ al 1 % en la punta de las pinzas con una pipeta de transferencia estándar de 1 ml sobre el portaobjetos del microscopio (Figure 28). El número óptimo de gotas de tetrazolio TZ al 1 % que puede contener un portaobjetos de microscopio es de entre 2,5 y 3 (2 gotas si es cuadrado).
Remueva las pinzas en la solución tetrazolio TZ sobre la superficie del portaobjetos del microscopio para asegurarse de que todas las semillas queden en el portaobjetos e intente separar cualquier cúmulo de semillas que se haya podido formar (Figure 29).
Por último, coloque con cuidado el cubreobjetos evitando que las semillas y el líquido caigan del portaobjetos (Figure 30, aquí es donde resulta útil el límite de 3 gotas del 1 % de tetrazolio TZ), minimizando, al mismo tiempo, el número de burbujas de aire detectadas. Para ello, intente presionar el centro del cristal protector que está encima del líquido en lugar de empezar a cubrir desde los bordes.justifiant la limite de 3 gouttes de TZ à 1 %) tout en minimisant le nombre de bulles d’air présentes. Pour ce faire, essayez de presser le milieu de lamelle couvre-objet sur le liquide au lieu de commencer à la positionner à partir des bords.
Es posible que queden burbujas atrapadas entre el cubreobjetos y el portaobjetos del microscopio, lo que podría afectar al análisis automatizado de la viabilidad. Para evitar que se formen burbujas, coloque la pipeta de 1 ml cerca del espacio entre el cubreobjetos y el portaobjetos, y deje caer lentamente un poco de líquido para que las burbujas se deshagan. Es posible que parte de la solución de tetrazolio TZ se derrame sobre el portaobjetos, pero puede retirar el exceso de líquido con una toalla.
Configuración y captura de imágenes
Microscopio Dino-Lite modelo AM4113T
Abrazadera Dino-Lite, por ejemplo, RK-05
Superficie con retroiluminación USB (caja de luz) con brillo ajustable
Ordenador portátil/de sobremesa con un mínimo de 2 puertos USB
Versión 2 o 3 del software DinoCapture instalado
Procedimiento:
Utilice la abrazadera para sujetar la Dino-Lite en posición vertical sobre la caja de luz y asegúrese de que se pueda bajar hasta que casi toque la superficie de la caja de luz, dejando suficiente espacio para que quepa un portaobjetos de microscopio debajo con unos milímetros de margen (Figure 31, Figure 32 y Figure 33).
Encienda el ordenador y conecte tanto la Dino-Lite como la base retroiluminada a través de los puertos USB del ordenador.
Encienda la caja de luz siguiendo el manual de instrucciones específico para su marca y modelo.
Abra el software DinoCapture (versión 2 o 3) y:
- Apague las luces LED de la Dino-Lite.
- Desactive la función de exposición automática (Figure 34).
- Seleccione una velocidad de obturación entre 1/15 y 1/60. Pruebe con estas dos opciones de velocidad de obturación y la caja de luz se iluminará para proporcionar un fondo blanco homogéneo sin sobreexponer los bordes de las semillas (Fig. 12).
Mueva el portaobjetos del microscopio por debajo de la lente para maximizar el número de semillas enfocadas; ajuste el brillo y el enfoque lo necesario.
Haga una foto pulsando el icono de la cámara en la ventana de visualización en directo del software (Figure 34).
Para guardar la imagen, haga clic con el botón derecho del ratón sobre la imagen en miniatura que aparece en el panel izquierdo y seleccione save as (guardar como). Elimine todas las marcas de la sección Imprint (Imprimir) y seleccione el tamaño máximo de imagen y los puntos por pulgada (dpi). Guarde la imagen en formato .jpeg.
Asegúrese de que el nombre del archivo contenga toda la información importante sobre la colección [nombre de la especie, número de colección o de accesión, número de réplica (si procede)] y realice una copia de seguridad para no perder la información.
Referencias
Seed viability testing using the Tetrazolium Chloride stain (Draft) - Millennium Seed Bank, Standard Operating Procedures 2.2
Methodology for epiphytic orchid seed viability test using Triphenyl Tetrazolium Chloride (TZ) - Millennium Seed Bank, Standard Operating Procedures 2.21
Sigma’s 2,3,5-Triphenyltetrazolium chloride Safety Data Sheet | SDS
Test au chlorure de tétrazolium et protocole d’imagerie
La version actuelle de ce document vise à présenter un système reproductible permettant de photographier les semences d’orchidées colorées afin de constituer une base de données d’images à des fins de formation de modèles. Toutefois, cela laisse une certaine marge de manœuvre pour mettre à jour vos dossiers de viabilité à l’aide de votre propre protocole de notation.
Préparation de la solution de chlorure de tétrazolium (TZ) à 1%
Gants conformes à la norme EN374 et lunettes de protection conformes à la norme EN166
Flacon ambré de 1 litre ou flacon en verre transparent de 1 litre et feuille d’aluminium
Eau distillée
Agitateur magnétique
pH-mètre
Procédure:
Dissolvez 3,63 g de dihydrogénophosphate de potassium (KH2PO4) dans 400 ml d’eau distillée dans un bécher en verre.
Dissolvez 7,13 g d’hydrogénophosphate de sodium dihydraté (Na2HPO4) dans 600 ml d’eau distillée dans un autre bécher en verre.
Lorsque ces stocks sont complètement dissous, mélangez les deux solutions dans un récipient en verre de 1 L et ajouter 10 g de chlorure de 2,3,5-triphényl-2H-tétrazolium. Agitez jusqu’à ce que toute la poudre soit dissoute et vérifiez que le pH de la solution est compris entre 6 et 8.
Inscrivez sur le flacon vos initiales, le contenu, la date de création et le symbole de danger chimique approprié (ou en suivant les protocoles spécifiques de votre laboratoire), puis stockez-le dans l’obscurité à 4 °C pendant une durée maximale de 3 mois. Si vous avez utilisé un flacon en verre transparent plutôt qu’un flacon en verre ambré, enveloppez le flacon dans une feuille d’aluminium avant de le conserver.
Tout réactif qui prend une couleur rose doit être mis au rebut
Coloration des orchidées
Papiers-filtres de 5 cm de diamètre
Feuille d’aluminium
Trombone recouvert de plastique
Crayon
Solution de TZ à 1 % (voir Section précédente)
Flacon Schott d’une capacité de 10 à 15 ml
Gants conformes à la norme EN374
Eau distillée
Lunettes de sécurité (EN166)
Incubateur à 30 °C
Procédure :
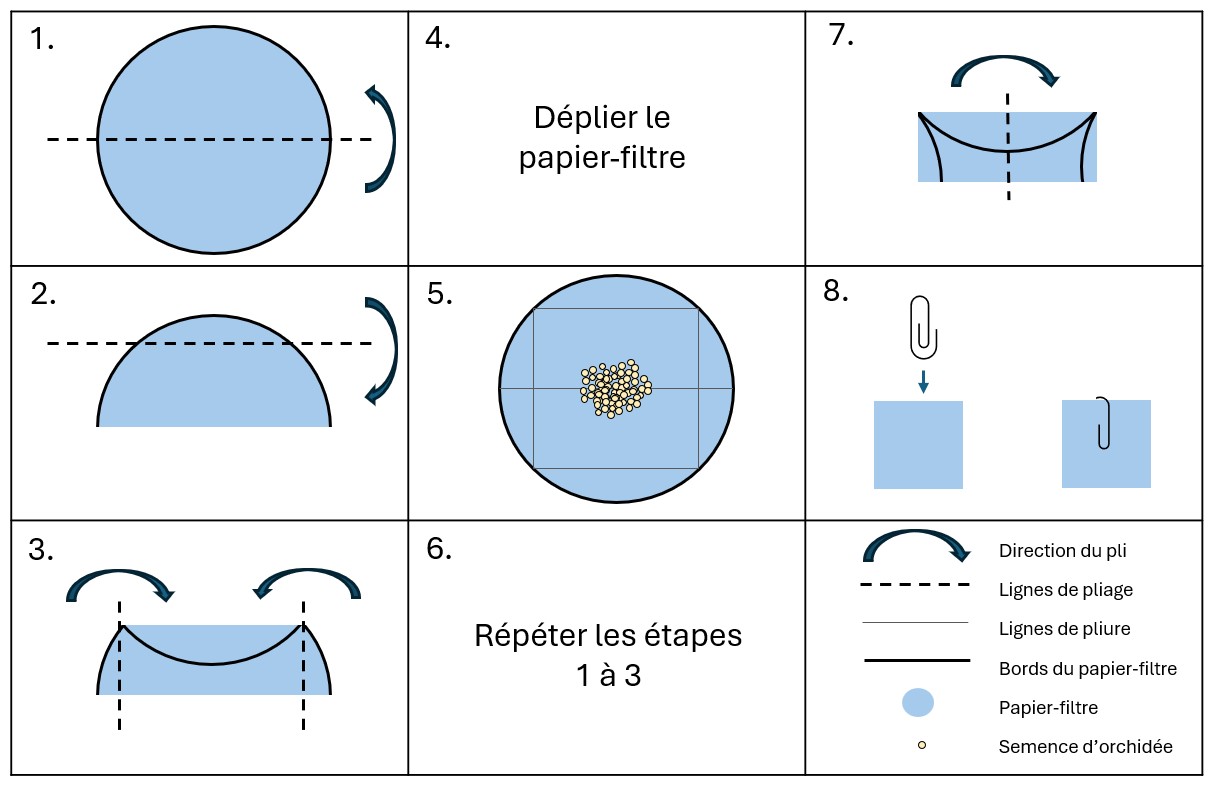
Pliez un morceau de papier-filtre pour former un sachet carré en suivant le schéma de la Figure 37 (étapes 1 to 3)
Notez sur l’extérieur du sachet à l’aide d’un crayon le numéro d’accession ou de collection de la semence (et le numéro de réplicat, le cas échéant).
Dépliez le sachet et placez au centre de celui-ci moins de 300 semences d’orchidées provenant d’une seule collection (Figure 37, étape 4). Le nombre correct de semences peut être déterminé en utilisant les données relatives au poids des semences et une balance de précision lorsqu’elle est disponible, ou être estimé en ramassant les semences à l’aide d’une spatule, comme illustré à la Figure 38.
Repliez le sachet en carré et utilisez un trombone recouvert de plastique pour fermer le sachet. (Figure 37 étapes 5-7)
Immergez le sachet dans une solution de TZ à 1 % dans un flacon Schott enveloppé d’une double couche de feuille d’aluminium (Figure 37, étape 8), en veillant à ce que le sachet soit entièrement immergé.
Placez dans un incubateur à 30 °C pendant au moins 24 heures et optimalement jusqu’à 48 heures.
Préparation des lames de microscope pour l’imagerie
Pince à épiler fine
Solution de TZ à 1 %
Lame de microscope en verre (dépoli)
Lamelle couvre-objet
Pipette (1 ml)
Gants conformes à la norme EN374
Lunettes de sécurité
Procédure :
Extrayez un sachet de la solution de TZ et retirez délicatement le trombone sans déchirer le papier. Dépliez le papier-filtre sur une surface plane.
À l’aide d’une pince à épiler à bout plat et fine, grattez délicatement les semences du papier-filtre sur une lame de microscope. Bien que certaines semences peuvent se déposer sur la lame de microscope, il est probable que la plupart des semences restent attachées aux pointes de la pince à épiler en raison de l’électricité statique (Figure 39). Il est possible de les déposer en versant avec précaution une goutte de TZ à 1 % provenant d’une pipette de transfert standard de 1 ml sur la pointe de la pince à épiler au-dessus de la lame de microscope (Figure 40). Le nombre optimal de gouttes de TZ à 1 % qu’une lame de microscope peut contenir se situe entre 2,5 et 3 (2 gouttes si elle est carrée).
Faites tourner la pince à épiler dans la solution de TZ sur la surface de la lame de microscope pour faire en sorte que toutes les semences se retrouvent sur la lame et essayez de séparer les agglutinations de semences qui pourraient s’être formées (Figure 41).
Enfin, positionnez soigneusement la lamelle couvre-objet en évitant que les semences et le liquide ne tombent de la lame (Figure 42, justifiant la limite de 3 gouttes de TZ à 1 %) tout en minimisant le nombre de bulles d’air présentes. Pour ce faire, essayez de presser le milieu de lamelle couvre-objet sur le liquide au lieu de commencer à la positionner à partir des bords.
Certaines bulles peuvent être piégées entre la lamelle couvre-objet et la lame de microscope, ce qui peut affecter l’analyse automatisée de la viabilité. Pour minimiser les bulles, placez la pipette de 1 ml près de l’espace entre la lamelle couvre-objet et la lame, et libérez lentement un peu de liquide pour permettre de déloger les bulles. Il se peut qu’une partie de la solution de TZ déborde sur la lame, mais vous pouvez absorber l’excès de liquide avec de l’essuie-tout.
Configuration de l’imagerie et capture des images
Microscope Dino-Lite modèle AM4113T
Statif de microscope Dino-Lite, par exemple RK-05
Surface rétroéclairée USB (caisson lumineux) avec luminosité réglable
Ordinateur portable / de bureau avec au moins 2 ports USB
Logiciel DinoCapture version 2 ou 3 installé
Procédure :
Utilisez le statif pour maintenir le Dino-Lite en position verticale au-dessus du caisson lumineux, en veillant à ce qu’il puisse être abaissé jusqu’à presque toucher la surface du caisson lumineux et en laissant suffisamment d’espace pour qu’une lame de microscope puisse être placée en dessous avec quelques millimètres de réserve (voir Figure 43, Figure 44 et Figure 45).
Allumez l’ordinateur et connectez le Dino-Lite et la base rétroéclairée à l’ordinateur via les ports USB.
Allumez le caisson lumineux en suivant les instructions du manuel d’utilisation spécifique à la marque et au modèle.
Ouvrez le logiciel DinoCapture (version 2 ou 3) et :
- Éteignez les voyants lumineux du Dino-Lite
- Désactivez la fonction d’exposition automatique (Figure 46).
- Sélectionnez une vitesse d’obturation entre 1/15 et 1/60 - Jouez avec ces deux options de vitesse d’obturation afin que le caisson lumineux s’éclaircisse et pour obtenir un fond blanc homogène sans surexposer les bords des semences (Fig. 12).
Déplacez la lame du microscope sous l’objectif pour maximiser le nombre de semences mises au point, en ajustant la luminosité et la mise au point si nécessaire.
Prenez une photo en appuyant sur l’icône de la caméra dans la fenêtre de visualisation en direct du logiciel (Figure 46)
Pour enregistrer l’image, cliquez-droit avec la souris sur la vignette de l’image dans le panneau de gauche et sur l’option save as (« Enregistrer sous »). Enlevez toutes les coches de la section Imprint (« Impression ») et sélectionnez la taille maximale de l’image et le nombre de ppp. Enregistrez l’image au format .jpeg.
Veillez à ce que le nom du fichier contienne toutes les informations importantes concernant la collection (nom de l’espèce, numéro de collection ou d’accession, numéro de réplicat (le cas échéant)) et créez une sauvegarde pour vous assurer de ne pas perdre les informations.
Références
Seed viability testing using the Tetrazolium Chloride stain (Draft) - Millennium Seed Bank, Standard Operating Procedures 2.2
Methodology for epiphytic orchid seed viability test using Triphenyl Tetrazolium Chloride (TZ) - Millennium Seed Bank, Standard Operating Procedures 2.21
Sigma’s 2,3,5-Triphenyltetrazolium chloride Safety Data Sheet | SDS
Teste com Cloreto de Tetrazólio e Protocolo de Imagem
A presente versão deste documento tem como objetivo descrever um sistema reproduzível para fotografar sementes de orquídeas coradas, a fim de criar uma base de dados de imagens para fins de treino de modelos. No entanto, permite também aproveitar esta oportunidade para atualizar os registos de viabilidade utilizando o seu próprio protocolo de avaliação.
Preparação da solução a 1% de Cloreto de Tetrazólio (TZ)
Luvas em conformidade com EN374 e proteção ocular em conformidade com EN166
Frasco âmbar de 1L ou frasco de vidro transparente de 1L com folha de alumínio
Água destilada
Agitador magnético
Medidor de pH
Procedimento:
Dissolver 3,63 g de fosfato monopotássico (KH2PO4) em 400 mL de água destilada num copo de vidro.
Dissolver 7,13 g de fosfato dissódico di-hidratado (Na2HPO4) em 600 mL de água destilada num copo de vidro separado.
Quando estas soluções estiverem completamente dissolvidas, misturar as duas num recipiente de vidro de 1 L e adicionar 10 g de cloreto de 2,3,5-trifenil tetrazólio. Mexer até todo o pó estar dissolvido e verificar se o pH da solução está entre 6 e 8.
Rotular o frasco com as suas iniciais, o conteúdo, a data de preparação e o símbolo de perigo químico apropriado (ou de acordo com os protocolos específicos do seu laboratório) e armazenar no escuro a 4 °C por um período máximo de 3 meses. Caso tenha utilizado um frasco de vidro transparente em vez de um frasco âmbar, envolver o frasco em folha de alumínio antes de armazenar.
Qualquer reagente que desenvolva uma coloração rosa deve ser eliminado.
Coloração das orquídeas
Papel de filtro com 5 cm de diâmetro
Folha de alumínio
Clipe de papel revestido de plástico
Lápis
Solução de TZ a 1% (ver secção anterior)
Recipiente de vidro Schott com capacidade entre 10 e 15 mL
Luvas em conformidade com EN374
Água destilada
Óculos de proteção (EN166)
Estufa a 30 °C
Procedimento:
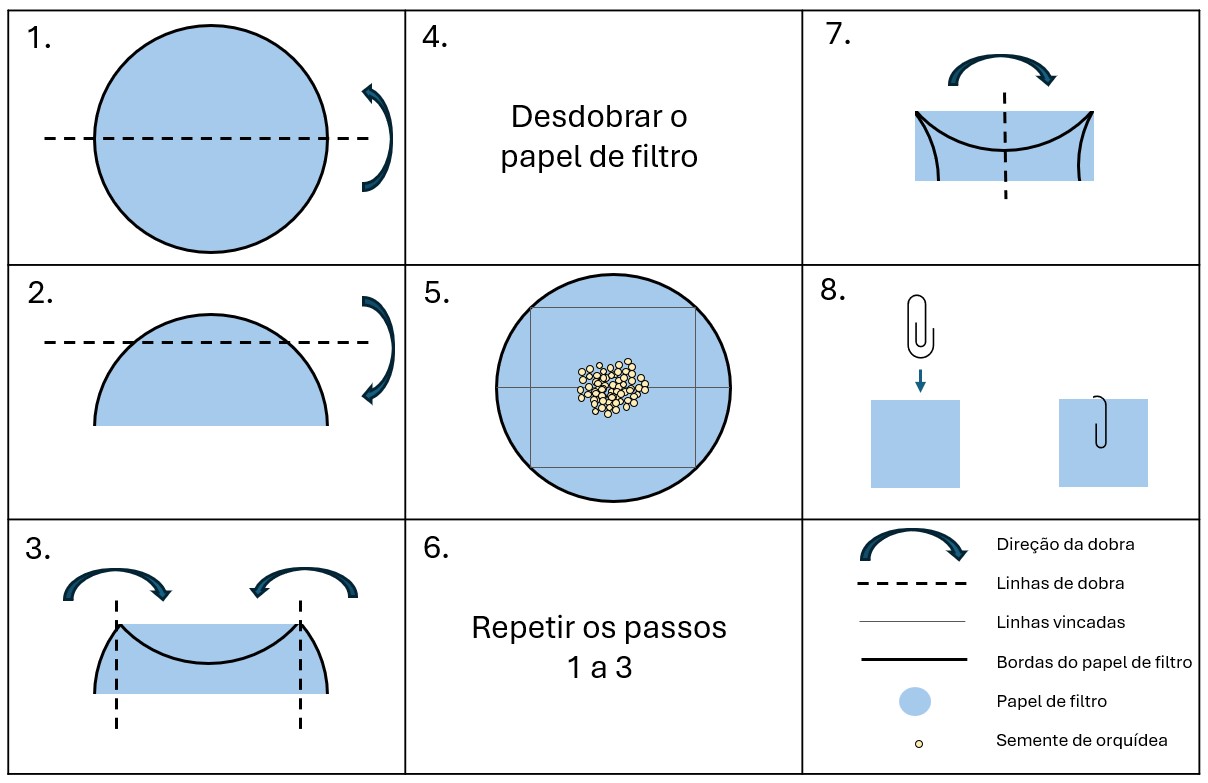
Dobrar uma folha de papel de filtro para criar um pequeno pacote quadrado, seguindo o diagrama da Figure 49 (Passos 1 a 3)
Identificar o exterior do pacote com um lápis, indicando o número de acesso ou de coleção da semente (e o número de réplica, se aplicável).
Desdobrar o pacote e colocar menos de 300 sementes de orquídea de uma única coleção no centro do papel (Figure 49, Passo 4). O número correto de sementes pode ser determinado utilizando dados de peso das sementes e uma balança de precisão, quando disponível, ou estimado retirando as sementes com uma espátula, conforme mostrado na Figure 50.
Voltar a dobrar o pacote em forma quadrada e utilizar um clipe de papel revestido de plástico para o fechar (Figure 49 Passos 5-7)
Submergir o pacote na solução de TZ a 1% dentro de um frasco Schott envolto em dupla camada de folha de alumínio (Figure 49, Passo 8), certificando-se de que o pacote fica totalmente submerso.
Colocar na estufa a 30 °C durante um mínimo de 24 horas, podendo permanecer até 48 horas.
Preparação da lâmina para microscopia e imagiologia
Pinças finas
Solução de TZ a 1%
Lâmina de microscópio de vidro (fosca)
Lamelas
Pipeta (1 mL)
Luvas em conformidade com EN374
Óculos de proteção
Procedimento:
Retirar o pacote da solução de TZ e remover cuidadosamente o clipe de papel, evitando rasgar o papel. Desdobrar o papel de filtro sobre uma superfície plana.
Com uma pinça de ponta fina e extremidade plana, raspar suavemente as sementes do papel de filtro para uma lâmina de microscópio. Embora algumas sementes caiam diretamente sobre a lâmina, é provável que a maioria fique presa às pontas das pinças devido à eletricidade estática (Figure 51). Estas podem ser facilmente removidas aplicando cuidadosamente uma gota de solução de TZ a 1% com uma pipeta de transferência padrão de 1 mL na ponta das pinças, sobre a lâmina (Figure 52). O número ideal de gotas de solução de TZ a 1% que uma lâmina de microscópio pode conter situa-se entre 2,5 e 3 (2 gotas, no caso de lâminas quadradas).
Mover as pinças em círculo sobre a superfície da lâmina, dentro da solução de TZ, para garantir que todas as sementes sejam transferidas para a lâmina e tentar separar quaisquer aglomerados de sementes que possam ter-se formado (Figure 53).
Por fim, posicionar cuidadosamente a lamela, evitando que as sementes e o líquido escorram da lâmina (Figure 54, é aqui que o limite de 3 gotas de solução de TZ a 1% se revela útil), minimizando o número de bolhas de ar. Para isso, pressionar o centro da lamela sobre o líquido em vez de começar a cobrir pelas bordas.
Algumas bolhas podem ficar presas entre a lamela e a lâmina do microscópio, o que pode afetar a análise automática de viabilidade. Para reduzir o número de bolhas, posicione a pipeta de 1 mL junto à fenda entre a lamela e a lâmina, e liberte lentamente um pouco de líquido para ajudar a desalojar as bolhas. Isto pode fazer com que alguma solução de TZ transborde sobre a lâmina, mas o excesso pode ser absorvido com uma toalha.
Configuração e captação de imagens
Câmara Dino-Lite modelo AM4113T
Suporte Dino-Lite, por exemplo RK-05
Superfície retroiluminada USB (caixa de luz) com brilho ajustável
Portátil/computador com um mínimo de 2 portas USB
Software DinoCapture versão 2 ou 3 instalado
Procedimento:
Utilize o suporte para manter a câmara Dino-Lite numa posição vertical acima da caixa de luz, garantindo que possa ser baixada até quase tocar a superfície da caixa, deixando espaço suficiente para colocar uma lâmina de microscópio por baixo, com alguns milímetros de folga (ver Figure 55, Figure 56 e Figure 57).
Ligue o computador e conecte tanto a câmara Dino-Lite como a base retroiluminada às portas USB do computador.
Ligue a caixa de luz seguindo as instruções do manual do fabricante específico do seu modelo.
Abra o software DinoCapture (versão 2 ou 3) e:
- Desligue as luzes LED da Dino-Lite
- Desative a função de exposição automática (Figure 58).
- Selecione uma velocidade do obturador entre 1/15 e 1/60 – Experimente estas duas velocidades e ajuste o brilho da caixa de luz até obter um fundo branco homogéneo, sem sobre-expor as bordas das sementes (Fig. 12).
Mova a lâmina do microscópio sob a lente para maximizar o número de sementes em foco, ajustando o brilho e o foco conforme necessário.
Tire uma fotografia pressionando o ícone da câmara na janela de visualização ao vivo do software (Figure 58)
Para guardar a imagem, Clique com o botão direito do rato sobre a miniatura da imagem no painel esquerdo e selecione save as (guardar como). Remova todas as opções assinaladas na secção imprint (imprint) e selecione o tamanho e resolução máximos da imagem. Guarde o ficheiro no formato .jpeg.
Certifique-se de que o nome do ficheiro inclui todas as informações importantes sobre a coleção (nome da espécie, número de coleção ou de acesso, número de réplica, se aplicável) e crie uma cópia de segurança para garantir que as informações não se perdem.
Referências
Seed viability testing using the Tetrazolium Chloride stain (Draft) - Millennium Seed Bank, Standard Operating Procedures 2.2
Methodology for epiphytic orchid seed viability test using Triphenyl Tetrazolium Chloride (TZ) - Millennium Seed Bank, Standard Operating Procedures 2.21
Sigma’s 2,3,5-Triphenyltetrazolium chloride Safety Data Sheet | SDS
วิธีการทดสอบด้วยสารเตตระโซเลียมคลอไรด์และขั้นตอนการถ่ายภาพ
เอกสารฉบับปัจจุบันมีวัตถุประสงค์เพื่ออธิบายระบบที่สามารถทำซ้ำได้ สำหรับการถ่ายภาพเมล็ดกล้วยไม้ที่ผ่านการย้อมสี เพื่อจัดทำฐานข้อมูลภาพสำหรับใช้ในการฝึกโมเดล อย่างไรก็ตาม เอกสารนี้ยังเปิดโอกาสให้คุณสามารถใช้ขั้นตอนนี้เพื่อปรับปรุงบันทึกข้อมูลความมีชีวิตของเมล็ดให้เป็นปัจจุบัน โดยใช้เกณฑ์การให้คะแนนของคุณเองด้วย
การเตรียมสารละลายเตตระโซเลียมคลอไรด์ (TZ) ที่มีความเข้มข้น 1%
ถุงมือตามมาตรฐาน EN374 และอุปกรณ์ป้องกันดวงตาตามมาตรฐาน EN166
ขวดสีชาขนาด 1 ลิตร หรือขวดแก้วใสขนาด 1 ลิตร และแผ่นฟอยล์อะลูมิเนียมหุ้ม
น้ำกลั่น
เครื่องกวนสารด้วยแท่งแม่เหล็ก
เครื่องวัดค่า pH
ขั้นตอนการปฏิบัติ:
ละลายโพแทสเซียมไดไฮโดรเจนออร์โธฟอสเฟต (KH2PO4) ปริมาณ 3.63 กรัม ในน้ำกลั่น 400 มล. ภายในบีกเกอร์แก้ว
ละลายไดโซเดียมไฮโดรเจนออร์โธฟอสเฟตไดไฮเดรต (Na2HPO4) ปริมาณ 7.13 กรัม ในน้ำกลั่น 600 มล. ภายในบีกเกอร์แก้วอีกใบหนึ่ง
เมื่อสารทั้งสองละลายหมดแล้ว ให้ผสมสารละลายทั้งสองเข้าด้วยกันในภาชนะแก้วขนาด 1 ลิตร แล้วเติม 2,3,5-ไตรฟีนิลเตตระโซเลียมคลอไรด์ 10 กรัมลงไป คนจนผงทั้งหมดละลายหมด จากนั้นตรวจสอบให้แน่ใจว่าค่า pH ของสารละลายอยู่ระหว่าง 6 ถึง 8
ติดฉลากบนขวดระบุชื่อย่อของผู้เตรียม รายการสารเคมี วันที่เตรียม และสัญลักษณ์อันตรายทางเคมีที่เหมาะสม (หรือเป็นไปตามแนวทางเฉพาะของห้องปฏิบัติการของคุณ) จากนั้นเก็บไว้ในที่มืดที่อุณหภูมิ 4 °C ไม่เกิน 3 เดือน หากคุณใช้ขวดแก้วใสแทนขวดสีชา ให้หุ้มขวดด้วยแผ่นฟอยล์อะลูมิเนียมก่อนนำไปเก็บ
สารเคมีใดก็ตามที่เปลี่ยนเป็นสีชมพู ให้ทิ้งทันที
การย้อมสีกล้วยไม้
กระดาษกรองเส้นผ่านศูนย์กลาง 5 ซม.
แผ่นฟอยล์อะลูมิเนียม
คลิปหนีบกระดาษหุ้มพลาสติก
ดินสอ
สารละลาย TZ ที่มีความเข้มข้น 1% (ดู ขั้นตอนในส่วนก่อนหน้า)
ภาชนะแก้ว Schott ความจุ 10-15 มล.
ถุงมือตามมาตรฐาน EN374
น้ำกลั่น
แว่นครอบตานิรภัย (EN166)
ตู้อบควบคุมอุณหภูมิที่ 30 °C
ขั้นตอนการปฏิบัติ:
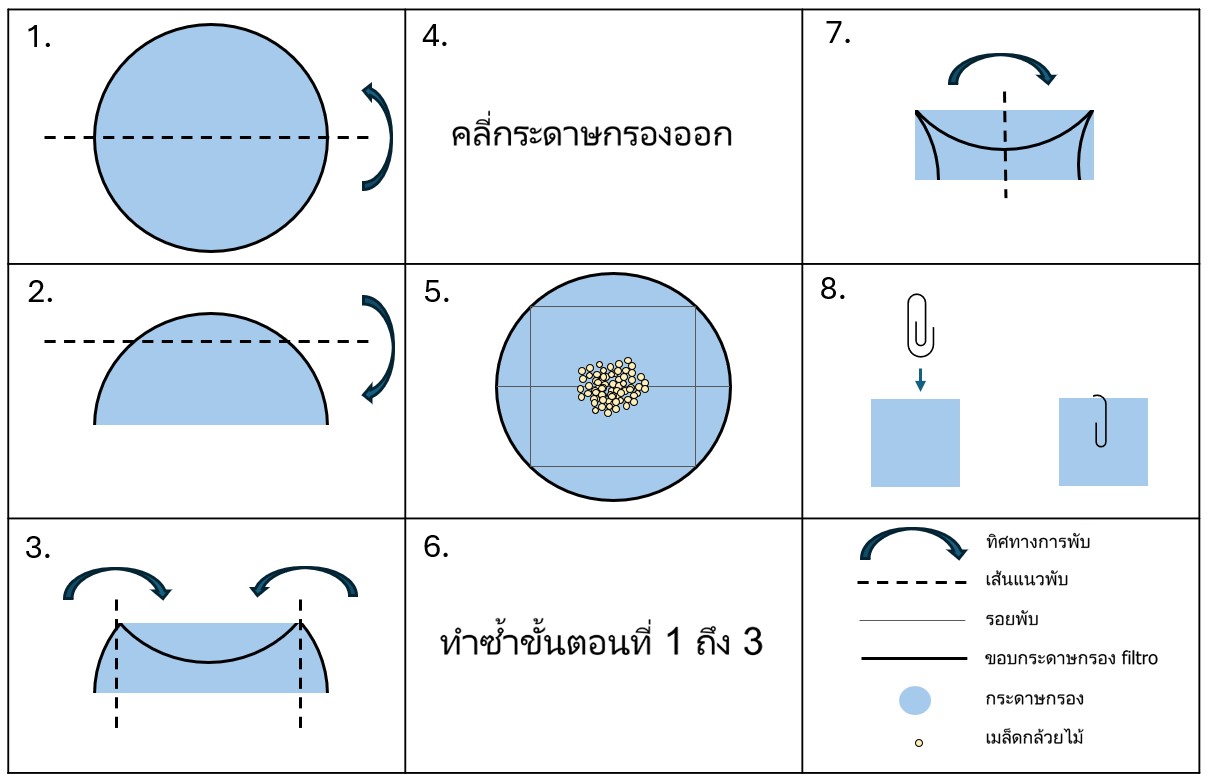
พับกระดาษกรองหนึ่งแผ่นให้เป็นซองรูปสี่เหลี่ยมจัตุรัสตามภาพตัวอย่างในFigure 61 (ขั้นตอนที่ 1 ถึง 3)
ใช้ดินสอเขียนหมายเลขชุดเก็บเมล็ดพันธุ์หรือหมายเลขการเก็บตัวอย่างไว้ด้านนอกของซอง (และระบุหมายเลขชุดซ้ำ หากมี)
คลี่ซองออก แล้วใส่เมล็ดกล้วยไม้จากชุดเก็บตัวอย่างเดียวกันลงตรงกลางซอง ไม่เกิน 300 เมล็ด (ดูFigure 61, ขั้นตอนที่ 4). จำนวนเมล็ดที่เหมาะสมสามารถคำนวณได้จากข้อมูลน้ำหนักเมล็ดโดยใช้เครื่องชั่งชนิดอ่านละเอียด หากไม่มีข้อมูลดังกล่าว สามารถกะปริมาณโดยใช้ช้อนตักสารทำการตักเมล็ดตามภาพใน Figure 62.
พับกระดาษกรองกลับเป็นรูปสี่เหลี่ยมจัตุรัสอีกครั้ง แล้วใช้คลิปหนีบกระดาษหุ้มพลาสติกหนีบปิดซองให้แน่น (ดูFigure 61 ขั้นตอนที่ 5-7)
นำซองกระดาษกรองแช่ลงในสารละลาย TZ ที่มีความเข้มข้น 1% ภายในขวดแก้ว Schott ที่หุ้มด้วยแผ่นฟอยล์อะลูมิเนียมสองชั้น (ดูFigure 61, ขั้นตอนที่ 8), โดยให้แน่ใจว่าซองจมอยู่ในสารละลายทั้งหมด
นำไปวางในตู้อบควบคุมอุณหภูมิที่ 30 °C เป็นเวลาอย่างน้อย 24 ชั่วโมง แต่ไม่เกิน 48 ชั่วโมง
การเตรียมแผ่นสไลด์กล้องจุลทรรศน์สำหรับการถ่ายภาพ
แหนบคีบปลายแหลม
สารละลาย TZ ที่มีความเข้มข้น 1%
กระจกสไลด์สำหรับกล้องจุลทรรศน์ (ชนิดฝ้า)
กระจกปิดสไลด์
ปิเปตต์ (1 มล.)
ถุงมือตามมาตรฐาน EN374
แว่นครอบตานิรภัย
ขั้นตอนการปฏิบัติ:
นำซองกระดาษกรองออกจากสารละลาย TZ แล้วค่อย ๆ ดึงคลิปหนีบกระดาษออกอย่างระมัดระวังโดยไม่ให้กระดาษฉีกขาด คลี่กระดาษกรองออกบนพื้นผิวเรียบ
ใช้แหนบปลายแหลมแบบปลายเรียบ ค่อย ๆ ขูดเมล็ดออกจากกระดาษกรองแล้วนำไปวางลงบนกระจกสไลด์สำหรับกล้องจุลทรรศน์ แม้ว่าเมล็ดบางส่วนจะตกลงบนกระจกสไลด์สำหรับกล้องจุลทรรศน์ แต่ส่วนใหญ่จะยังคงติดอยู่ที่ปลายแหนบเนื่องจากไฟฟ้าสถิต (ดูFigure 63). คุณสามารถนำเมล็ดเหล่านี้ออกได้ง่าย ๆ เพียงแค่หยดสารละลาย TZ ที่มีความเข้มข้น 1% ลงบนปลายแหนบอย่างระมัดระวัง โดยใช้ปิเปตต์ส่งถ่ายขนาด 1 มล. หยดลงเหนือกระจกสไลด์ (ดูFigure 64)ปริมาณหยดของสารละลาย TZ ที่มีความเข้มข้น 1% ที่เหมาะสมบนกระจกสไลด์คือประมาณ 2.5 ถึง 3 หยด (หากใช้สไลด์ทรงสี่เหลี่ยมควรใช้ 2 หยด).
หมุนปลายแหนบเบา ๆ ขณะจุ่มอยู่ในสารละลาย TZ บนผิวกระจกสไลด์ เพื่อให้แน่ใจว่าเมล็ดทั้งหมดตกอยู่บนสไลด์และช่วยแยกกลุ่มเมล็ดที่อาจจับตัวกัน (ดู?@fig-swirlth)
สุดท้าย วางกระจกปิดสไลด์อย่างระมัดระวัง โดยหลีกเลี่ยงไม่ให้เมล็ดหรือของเหลวไหลออกจากสไลด์ (ดูFigure 65ซึ่งเป็นเหตุผลที่จำกัดปริมาณสารละลาย TZ ที่มีความเข้มข้น 1% ไว้ที่ประมาณ 3 หยด ซึ่งใช้ประโยชน์ได้ ) และพยายามลดจำนวนฟองอากาศให้เหลือน้อยที่สุด โดยพยายามกดตรงกลางของกระจกปิดสไลด์ลงบนของเหลว แทนที่จะเริ่มต้นจากขอบ
aria-description=“”
ฟองอากาศบางส่วนอาจติดอยู่ระหว่างกระจกปิดสไลด์กับกระจกสไลด์สำหรับกล้องจุลทรรศน์ ซึ่งอาจส่งผลต่อการวิเคราะห์ความมีชีวิตของเมล็ดแบบอัตโนมัติ เพื่อช่วยลดการเกิดฟองอากาศ ให้วางปิเปตต์ขนาด 1 มล. ใกล้ช่องว่างระหว่างกระจกปิดสไลด์กับกระจกสไลด์ แล้วค่อย ๆ ปล่อยของเหลวเล็กน้อยเพื่อช่วยขับฟองอากาศออก วิธีนี้อาจทำให้สารละลาย TZ บางส่วนล้นออกมาบนสไลด์เล็กน้อย แต่คุณสามารถซับของเหลวส่วนเกินออกได้ด้วยผ้าขนหนู
การตั้งค่าระบบและการถ่ายภาพ
Dino-Lite รุ่น AM4113T
ตัวยึดกล้อง Dino-Lite เช่น RK-05
พื้นผิวส่องสว่างแบบไฟแบ็คไลท์ (กล่องไฟ) ที่สามารถปรับความสว่างได้และเชื่อมต่อผ่านพอร์ต USB
แล็ปท็อป/คอมพิวเตอร์ที่มีพอร์ต USB อย่างน้อย 2 พอร์ต
ติดตั้งซอฟต์แวร์ DinoCapture เวอร์ชัน 2 หรือ 3
ขั้นตอนการปฏิบัติ:
ใช้ตัวยึดกล้องยึด Dino-Lite ให้อยู่ในแนวตั้งเหนือกล่องไฟ โดยปรับระดับให้สามารถลดความสูงลงได้จนเกือบแตะผิวหน้ากล่องไฟ และเว้นระยะห่างพอสำหรับวางกระจกสไลด์ไว้ข้างใต้ได้สักสองถึงสามมิลลิเมตร (ดูFigure 66, Figure 67 และ Figure 68).
เปิดคอมพิวเตอร์ แล้วเชื่อมต่อกล้อง Dino-Lite และฐานส่องสว่างแบบไฟแบ็คไลท์เข้ากับคอมพิวเตอร์ผ่านพอร์ต USB
เปิดกล่องไฟโดยปฏิบัติตามคู่มือการใช้งานของยี่ห้อและรุ่นที่คุณใช้
เปิดซอฟต์แวร์ DinoCapture (เวอร์ชัน 2 หรือ 3) แล้วดำเนินการดังนี้:
- ปิดไฟ LED ของกล้อง Dino-Lite
- ปิดฟังก์ชันการเปิดรับแสงอัตโนมัติ (ดูFigure 69).
- เลือกความเร็วชัตเตอร์ระหว่าง 1/15 ถึง 1/60 – ลองปรับความเร็วชัตเตอร์ระหว่างค่าทั้งสองนี้ร่วมกับความสว่างของกล่องไฟเพื่อให้ได้พื้นหลังสีขาวเรียบสม่ำเสมอ โดยไม่ทำให้ขอบเมล็ดสว่างเกินไป (ดูFig. 12).
ขยับกระจกสไลด์สำหรับกล้องจุลทรรศน์ไปมาภายใต้เลนส์เพื่อให้มีจำนวนเมล็ดอยู่ในระยะโฟกัสมากที่สุด พร้อมปรับความสว่างและโฟกัสตามความเหมาะสม
ถ่ายภาพโดยกดไอคอนรูปกล้องในหน้าต่างแสดงภาพแบบเรียลไทม์ของซอฟต์แวร์ (ดูFigure 69)
หากต้องการบันทึกภาพ ให้คลิกขวาที่ด้านบนของภาพขนาดย่อในแผงด้านซ้าย แล้วเลือก save as (บันทึกเป็น) ยกเลิกเครื่องหมายถูกทั้งหมดในส่วน imprint (การแสดงข้อความบนภาพ) และเลือกขนาดภาพและความละเอียด (dpi) สูงสุด บันทึกภาพในรูปแบบไฟล์ .jpeg
ตรวจสอบให้แน่ใจว่าชื่อไฟล์มีข้อมูลสำคัญครบถ้วนเกี่ยวกับชุดตัวอย่าง ได้แก่ ชื่อชนิดพันธุ์ หมายเลขการเก็บตัวอย่างหรือหมายเลขชุดเก็บเมล็ดพันธุ์ และหมายเลขชุดซ้ำ (หากมี) จากนั้นสร้างไฟล์สำรองเพื่อป้องกันข้อมูลสูญหาย
เอกสารอ้างอิง
Seed viability testing using the Tetrazolium Chloride stain (Draft) - Millennium Seed Bank, Standard Operating Procedures 2.2
Methodology for epiphytic orchid seed viability test using Triphenyl Tetrazolium Chloride (TZ) - Millennium Seed Bank, Standard Operating Procedures 2.21
Sigma’s 2,3,5-Triphenyltetrazolium chloride Safety Data Sheet | SDS
Protokol Pengujian Tetrazolium Klorida dan Pencitraan
Versi dokumen ini bertujuan untuk menjabarkan sistem yang dapat direplikasi untuk memotret benih anggrek yang telah diwarnai, guna menyusun basis data gambar untuk keperluan pelatihan model. Namun, dokumen ini juga memberikan ruang bagi Anda untuk memanfaatkan kesempatan ini guna memperbarui catatan daya hidup dengan menggunakan protokol penilaian Anda sendiri.
Persiapan larutan Tetrazolium klorida (TZ) 1%
Sarung tangan sesuai standar EN374 & pelindung mata sesuai standar EN166
Botol kaca cokelat 1 L atau botol kaca bening 1 L serta foil aluminium
Air suling
Pengaduk magnetik
Pengukur pH
Prosedur:
Larutkan 3,63 g Kalium dihidrogen ortofosfat (KH₂PO₄) ke dalam 400 mL air suling di dalam gelas piala kaca.
Larutkan 7,13 g Dinatrium hidrogen ortofosfat dihidrat (Na₂HPO₄) ke dalam 600 mL air suling di dalam gelas kimia terpisah.
Setelah kedua larutan stok tersebut benar-benar larut, campurkan keduanya dalam wadah kaca berkapasitas 1 L dan tambahkan 10 g 2,3,5-trifenil tetrazolium klorida. Aduk hingga seluruh serbuk larut dan pastikan pH larutan antara 6 dan 8.
Labeli botol dengan inisial Anda, isinya, tanggal pembuatan, dan simbol bahaya kimia yang sesuai (atau sesuai protokol laboratorium spesifik Anda), lalu simpan di tempat gelap dengan suhu 4 °C selama tidak lebih dari 3 bulan. Jika Anda menggunakan botol kaca bening, bukan botol kaca cokelat, bungkus botol tersebut dengan foil aluminium sebelum disimpan.
Setiap reagen yang berubah menjadi warna merah muda harus dibuang.
Pewarnaan anggrek
Kertas saring berdiameter 5 cm
Foil aluminium
Penjepit kertas berlapis plastik
Pensil
Larutan TZ 1% (lihat bagian sebelumnya)
Wadah kaca Schott berkapasitas 10-15 mL
Sarung tangan yang sesuai dengan EN374
Air suling
Kacamata pengaman (EN166)
Inkubator dengan suhu 30 °C
Prosedur:
Lipat selembar kertas saring untuk membuat bungkus persegi mengikuti diagram pada Figure 72 (Langkah 1 sampai 3)
Tulis label di bagian luar bungkus menggunakan pensil dengan nomor aksesi atau nomor koleksi benih (dan nomor ulangan jika diperlukan).
Buka lipatan bungkus tersebut dan letakkan kurang dari 300 benih anggrek dari satu koleksi di bagian tengah bungkus (Figure 72, Langkah 4). Jumlah benih yang tepat dapat ditentukan menggunakan data bobot benih dan timbangan presisi jika tersedia, atau diperkirakan dengan cara mengambil benih menggunakan spatula, seperti ditunjukkan pada Figure 73.
Lipat kembali bungkus tersebut hingga berbentuk persegi dan gunakan penjepit kertas berlapis plastik untuk menutup bungkus dengan rapat (Figure 72 Langkah 5-7).
Celupkan bungkus tersebut ke dalam larutan TZ 1% di dalam botol Schott yang dibungkus dengan dua lapis foil aluminium (Figure 72, Langkah 8), dengan memastikan bungkusan terendam seluruhnya.
Masukkan ke inkubator dengan suhu 30 °C selama minimal 24 jam, tetapi dapat diperpanjang hingga 48 jam.
Persiapan salindia mikroskop untuk pencitraan
Pinset tipis
Larutan TZ 1%
Salindia kaca mikroskop (berlapis buram)
Kaca penutup
Pipet (1 mL)
Sarung tangan yang sesuai dengan EN374
Kacamata pengaman
Prosedur:
Keluarkan satu bungkus dari larutan TZ dan lepaskan penjepit kertas dengan hati-hati tanpa merobek kertas. Buka lipatan kertas saring di atas permukaan datar.
Dengan menggunakan pinset ujung tipis dan datar, gosok perlahan benih dari kertas saring ke salindia mikroskop. Meskipun beberapa benih akan berpindah ke salindia, kemungkinan sebagian besar benih akan tetap menempel pada ujung pinset karena muatan statis (Figure 74). Benih yang menempel dapat dengan mudah dilepaskan dengan meneteskan sedikit larutan TZ 1% menggunakan pipet transfer standar 1 mL ke ujung pinset di atas salindia mikroskop (Figure 75). Jumlah tetesan optimal larutan TZ 1% yang dapat ditampung oleh salindia mikroskop antara 2,5 hingga 3 tetes (2 tetes jika salindia berbentuk persegi).
Putar pinset perlahan di dalam larutan TZ pada permukaan salindia untuk memastikan semua benih berpindah ke salindia, dan usahakan memisahkan setiap kelompok benih yang mungkin terbentuk (Figure 76).
Terakhir, letakkan kaca penutup dengan hati-hati agar benih dan cairan tidak tumpah dari salindia (Figure 77, inilah alasan batas 3 tetes larutan TZ 1% berguna), sambil mengurangi jumlah gelembung udara yang terbentuk. Untuk melakukannya, tekan bagian tengah kaca penutup di atas cairan terlebih dahulu, bukan mulai menutup dari tepiannya.
Beberapa gelembung mungkin terperangkap di antara kaca penutup dan salindia mikroskop, yang dapat memengaruhi analisis daya hidup otomatis. Untuk mengurangi gelembung, posisikan pipet 1 mL di dekat celah antara kaca penutup dan salindia, lalu lepaskan cairan secara perlahan untuk membantu melepaskan gelembung. Tindakan ini mungkin menyebabkan sebagian larutan TZ meluap ke salindia, tetapi Anda dapat menyerap kelebihan cairan tersebut dengan tisu.
Menyiapkan dan menangkap gambar
Dino-Lite model AM4113T
Klem Dino-Lite, misalnya RK-05
Permukaan dengan pencahayaan belakang USB (light box) yang dapat diatur tingkat kecerahannya
Laptop/komputer dengan minimal 2 port USB
Perangkat lunak DinoCapture versi 2 atau 3 telah terpasang
Prosedur:
Gunakan klem untuk menahan Dino-Lite dalam posisi vertikal di atas kotak cahaya, dengan memastikan alat tersebut dapat diturunkan hingga hampir menyentuh permukaan kotak cahaya dengan menyisakan ruang beberapa milimeter agar salindia mikroskop dapat diletakkan di bawahnya (lihat Figure 78, Figure 79 dan Figure 80).
Nyalakan komputer dan sambungkan Dino-Lite serta alas berpencahayaan belakang ke komputer melalui port USB.
Nyalakan kotak cahaya sesuai dengan petunjuk pada manual untuk merek dan model yang Anda gunakan.
Buka perangkat lunak DinoCapture (versi 2 atau 3) dan::
- Matikan lampu LED pada Dino-Lite
- Nonaktifkan fungsi pencahayaan otomatis (Figure 81).
- Pilih kecepatan rana antara 1/15 dan 1/60 – Coba sesuaikan kedua opsi kecepatan rana ini dan tingkat kecerahan kotak cahaya untuk mendapatkan latar belakang putih yang merata tanpa membuat tepi benih terpapar cahaya berlebihan (Fig. 12).
Geser salindia mikroskop di bawah lensa untuk memaksimalkan jumlah benih yang berada dalam fokus, sambil menyesuaikan kecerahan dan fokus sesuai kebutuhan.
Ambil gambar dengan menekan ikon kamera pada jendela tampilan langsung di perangkat lunak (Figure 81)
Untuk menyimpan gambar, klik kanan pada gambar mini di panel kiri lalu pilih save as (simpan sebagai). Hapus semua tanda centang dari bagian imprint (cap) dan pilih ukuran gambar serta resolusi dpi maksimum. Simpan gambar dalam format .jpeg.
Pastikan nama file memuat semua informasi penting tentang koleksi (nama spesies, nomor koleksi atau nomor aksesi, nomor ulangan jika ada), dan buat salinan cadangan untuk memastikan informasi tersebut tidak hilang.
Referensi
Seed viability testing using the Tetrazolium Chloride stain (Draft) - Millennium Seed Bank, Standard Operating Procedures 2.2
Methodology for epiphytic orchid seed viability test using Triphenyl Tetrazolium Chloride (TZ) - Millennium Seed Bank, Standard Operating Procedures 2.21
Sigma’s 2,3,5-Triphenyltetrazolium chloride Safety Data Sheet | SDS
三苯基氯化四氮唑检测与成像方案
本文档的当前版本旨在概述一套可复现的染色兰花种子拍摄体系,以便建立模型训练所需的图像数据库。同时,它也预留了灵活空间,便于用户充分利用机会通过自有的评分方案更新活力记录。
1% 三苯基氯化四氮唑 (TZ) 溶液制备
程序:
取 3.63 g 磷酸二氢钾 (KH2PO4) 置于玻璃烧杯中,然后注入 400 mL 蒸馏水将其溶解。
取 7.13 g 磷酸氢二钠二水合物 (Na2HPO4) 置于另一个玻璃烧杯中,然后注入 600 mL 蒸馏水将其溶解。
待这些原料完全溶解后,将两种溶液转移至 1L 玻璃容器中混合,然后加入 10 g 2,3,5-三苯基氯化四氮唑。搅拌至粉末完全溶解,然后核实溶液的 pH 值介于 6 与 8 之间。
在瓶身粘贴标签,标明制备者姓名首字母、溶液成分、配制日期及相应化学品危害符号(或遵循具体实验室规程), 然后在 4℃ 的温度下避光储存,储存时间不超过 3 个月。如果采用透明玻璃瓶而非琥珀色玻璃瓶,请用铝箔纸妥善包裹玻璃瓶后储存。
任何出现粉红色变化的试剂均应丢弃
兰花染色
直径为 5 cm 的滤纸
铝箔 纸
塑封回形针
铅笔
1% TZ 溶液(请参阅 上一节)
容积为 10-15 mL 的 Schott 玻璃容器
符合 EN374 标准的手套
蒸馏水
安全护目镜(符合 EN166 标准)
30℃ 恒温培养箱
程序:
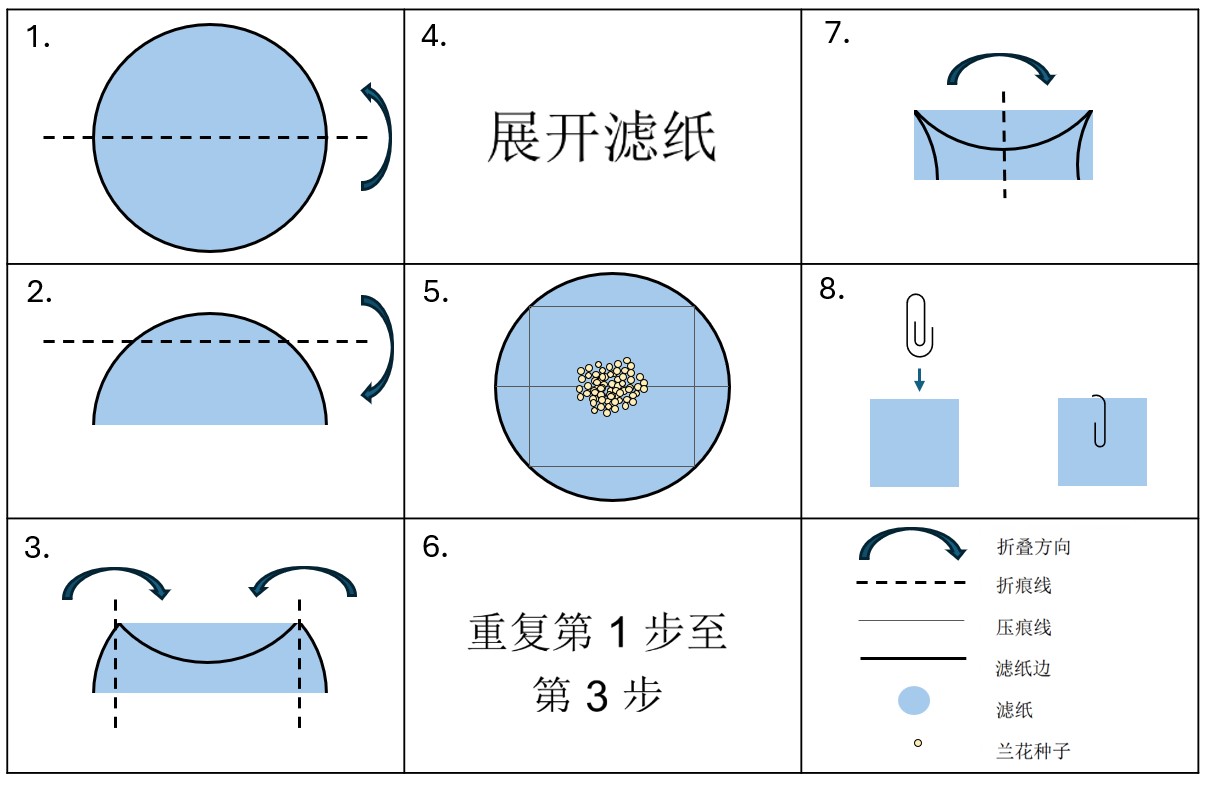
按照 Figure 84 (第 1 步至第 3 步) 所示方法折叠滤纸,制成方形滤纸包。
在滤纸包外壁粘贴标签,然后用铅笔在标签上标明种子入库编号/采集号(如需重复实验,还应标明重复编号)。
展开滤纸包,将单次采集的兰花种子(少于 300 粒)置于滤纸中央 (Figure 84, 第 4 步)。 正确的种子数量可以使用种子重量数据和精确天平(如有)来确定,也可以通过刮勺舀取种子来估算, 如 Figure 85 所示。
将滤纸重新折叠成方形滤纸包,然后用塑封回形针将滤纸包封口 (Figure 84 第 5 步至第 7 步)。
将滤纸包浸没在用双层铝箔 纸包裹的Schott瓶 (Figure 84, 第 8 步) 所装盛的 1% TZ 溶液中,确保滤纸包完全浸没。
在 30℃ 恒温培养箱中,将装有纸包的Schott瓶静置至少 24 小时,但最多不超过 48 小时。
成像用显微镜载玻片制备
细头镊子
1% TZ 溶液
(磨砂)玻璃显微镜载玻片
盖玻片
移液器(1 mL 容量)
符合 EN374 标准的手套
安全护目镜
程序:
从 TZ 溶液中取出滤纸包,然后小心地移除回形针,注意不要撕破滤纸。在平坦台面上展开滤纸。
用一把细尖平头镊子轻轻地将滤纸上的种子刮落到显微镜载玻片上。虽然一部分种子会成功转移到载玻片上,但大多数种子则很可能会因静电吸附于镊尖 (Figure 86)。使用标准 1 mL 移液管吸取一滴 1% TZ 溶液,在玻片上方向镊尖部位滴加液滴 (Figure 87),即可轻松地取下这些吸附的种子。载玻片适宜承载 2.5-3 滴 1% TZ 溶液(对于方形载玻片,则为 2 滴)。
在显微镜载玻片表面的 TZ 溶液中旋动镊尖,确保所有种子都成功转移到载玻片上,并分离可能形成的任何种子团簇 (Figure 88)。
最后,小心地放置盖玻片,防止种子与液体从载玻片上掉落 (Figure 89, 此时需遵循 3 滴 1% TZ 溶液的用量限制), 同时尽量减少产生的气泡。为此,请尝试将盖玻片的中间部分按压在液体上,而不是从边缘开始覆盖。
一些气泡可能会滞留在盖玻片和显微镜载玻片之间,而这会导致自动化活性分析受到影响。为了尽量减少气泡,将 1 mL 移液管放置在盖玻片与载玻片之间的间隙附近,然后缓慢释放少许液体以帮助驱除气泡。此操作可能会导致一些 TZ 溶液溢出到载玻片上,但您可以用纸巾吸除多余的液体。
成像设置与捕获
Dino-Lite AM4113T 型相机
Dino-Lite 夹具,例如 RK-05
可调亮度 USB 背光板(观片灯)
具有至少 2 个 USB 端口的笔记本电脑/台式计算机
已安装的 DinoCapture 2 或 3 版本软件
程序:
使用夹具将 Dino-Lite 相机垂直固定于观片灯上方,确保可以将相机降低,直到它几乎接触到观片灯的表面,同时在相机底部与观灯片表面之间留出几毫米间隙,以便安装载玻片(请参阅 Figure 90, Figure 91 和 Figure 92)。
开启台式计算机,并通过 USB 端口将 Dino Lite 相机和背光底座连接至台式计算机。
按照适用于特定品牌和型号的说明手册开启观片灯。
打开 DinoCapture 软件(版本 2 或 3),然后:
- 关闭 Dino Lite LED 灯
- 关闭自动曝光功能 (Figure 93).
- 选择 1/15 至 1/60 之间的快门速度 — 利用这两个快门速度选项进行试拍,并使观片灯变亮,从而获得均匀的白色背景且不过度曝光种子边缘 (Fig. 12).
在镜头下移动载玻片,使尽可能多的种子处于焦距范围内,并根据需要调节亮度与焦距。
按下软件实时预览窗口的相机图标以进行拍摄 (Figure 93)
若想保存图像,请右键单击左侧面板中图像缩略图的顶部,然后选择 “save as (另存为)”。取消勾选 “Imprint ( 印记)”部分的所有选项,然后选择最大图像尺寸与分辨率。以 .jpeg 格式保存图像。
确保文件名包含有关采集内容的所用重要信息(例如物种名、采集/入库编号以及重复号码(如果适用), 并创建备份以确保信息不会丢失。
参考文献
Seed viability testing using the Tetrazolium Chloride stain (Draft) - Millennium Seed Bank, Standard Operating Procedures 2.2
Methodology for epiphytic orchid seed viability test using Triphenyl Tetrazolium Chloride (TZ) - Millennium Seed Bank, Standard Operating Procedures 2.21
Sigma’s 2,3,5-Triphenyltetrazolium chloride Safety Data Sheet | SDS
テトラゾリウムクロリド試験と画像プロトコル
このドキュメントの現在のバージョンでは、染色したランの種子を撮影し、モデルトレーニング用の画像データベースをキュレートするための再現可能なシステムの概要を説明することを目的としています。ただし、この機会を利用し、各自のスコアリングプロトコルを使用した生存率記録の更新を行う余地も残されています。
テトラゾリウムクロリド (TZ) 1% 溶液の調製
手順:
ガラスビーカーに入れた 400 mL の蒸留水に、3.63 g のリン酸水素二カリウム (KH2PO4) を溶解する。
別のガラスビーカーに入れた 600 mL の蒸留水に、 7.13 g のリン酸水素二ナトリウム・二水和物 (Na2HPO4) を溶解する。
これらが完全に溶解したら、その二つの溶液を 1L のガラス容器に入れて混合し、 2,3,5-トリフェニルテトラゾリウムクロリド 10 g を加える。 粉末がすべて溶けるまで撹拌し、 溶液の pH が 6~8 の間であることを確認する。
ボトルにイニシャル、 内容物、 作成日、 適切な化学品危険有害性記号をラベル付けし (または特定のラボプロトコルに従う)、 4°C の暗所で保存 (3 カ月以内)する。 琥珀色のガラス瓶ではなく透明なガラス瓶を使用した場合は、 保管前に瓶をアルミホイルで包む。
ピンク色になった試薬はすべて廃棄すること
ランの染色
直径 5 cm のろ紙
アルミホイル
プラスチックで覆われたペーパークリップ
鉛筆
TZ 1% 溶液 (前のセクションを参照)
Schott ガラス瓶 (容量 10~15 mL)
EN374 準拠の手袋
蒸留水
安全ゴーグル (EN166)
インキュベーター (30°C)
手順:
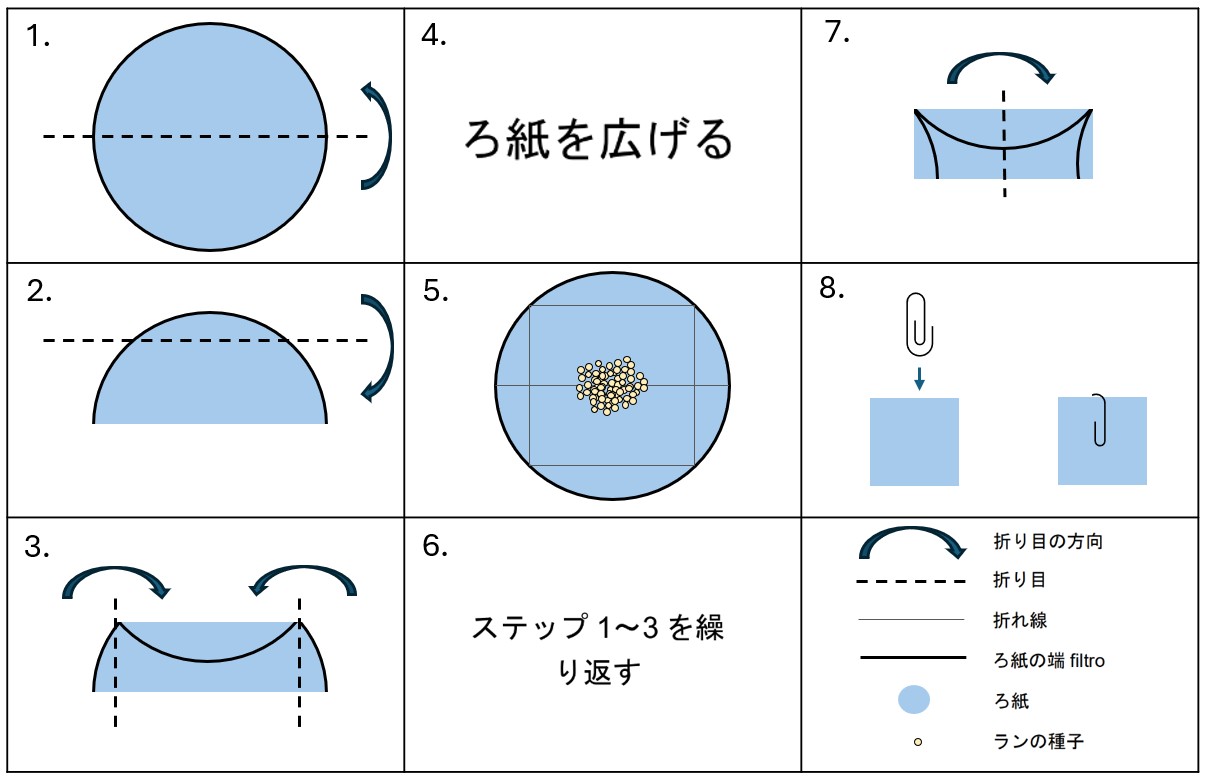
Figure 96(ステップ 1~3) の図解に従って、 ろ紙を折って正方形の包みを作る。
包みの外側に、 種子アクセス番号または採集番号 (必要に応じて複製番号も) を鉛筆で記しラベリングする。
包みを広げ、 一度の採集から得られた 300 個以下のランの種子を包みの中央に置く (Figure 96, ステップ 4)。 種子の正確な数は、 種子の重量データおよび利用可能な場合は精密天秤を使用して決定するか、 または Figure 97 に示すようにスパチュラで種子をすくうことで推定できる。
包みを正方形に折り直し、 プラスチックで覆われたペーパークリップを使用して包みを閉じる (Figure 96 ステップ 5~7)。
アルミホイルを二重に巻いた Schott 瓶に TZ 1% 溶液を入れ、 包みを浸し、 包み (Figure 96、 ステップ 8) を完全に浸す。
30°C のインキュベーターに、 最低 24 時間、 最大 48 時間置く。
画像撮影のための顕微鏡スライドの準備
細いピンセット
TZ 1%溶液
顕微鏡用スライドグラス(フロスト)
カバースリップ
ピペット (1 mL)
EN374 準拠の手袋
安全ゴーグル
手順:
TZ溶液から包みを取り出し、 紙を破らないように慎重にペーパークリップを外す。 ろ紙を平らな面に広げる。
先端の細い平らなピンセットで、 ろ紙から種子を優しくこすり取り、 顕微鏡スライドに載せる。 一部の種子は顕微鏡スライドに移るが、 ほとんどの種子は静電気のためにピンセットの先端に付着したままになる可能性がある (Figure 98)。 これらの種子は、標準的な 1 mL トランスファーピペットから TZ 1% を一滴、 顕微鏡スライド上のピンセット先端に注意深く垂らすことで容易に取り除くことができる (Figure 99)。 顕微鏡スライドに保持できる TZ 1% の最適な滴下数は、 2.5~3 滴 (正方形の場合は2滴) である。
ピンセットを顕微鏡スライド表面の TZ 溶液内に入れて円を描くように動かして、 すべての種子がスライド上に移動したことを確認し、 形成された種子の塊があればなるべく分離させる (Figure 100)。
最後に、 気泡の数を最小限に抑えながら、 種子と液体がスライドからこぼれ落ちないようにカバースリップを慎重に配置する (Figure 101、 ここで、 TZ 1% を 3 滴に制限したことが役立つ)。 そうするために、 端からカバーグラスを覆い始めるのではなく、 カバーグラスの中央を液体の上に押し付けるようする。
カバースリップと顕微鏡スライドの間に気泡が入り込むことがあり、 自動化された生存率分析に影響を与える可能性がある。 気泡を最小限に抑えるには、 カバースリップとスライドの間の隙間近くに 1 mL ピペットを置き、 液体をゆっくりと垂らして気泡を押し出す。 これにより、 一部のTZ溶液がスライドに溢れる可能性があるが、 余分な液体はタオルを使って吸い取ることができる。
画像のセットアップと撮影
Dino-Lite モデル AM4113T
Dino-Lite クランプ (RK-05 など)
輝度調整可能な USB バックライトサーフェス (ライトボックス)
2 つ以上の USB ポートを備えたノートパソコン/コンピュータ
インストール済みの DinoCapture ソフトウェアバージョン 2 または 3
手順:
クランプを使用して、ライトボックス上方に Dino-Lite を垂直位置に固定し、 ライトボックスの表面にほぼ触れるまで下げ、 顕微鏡スライドが下に収まるのに十分な数ミリのスペースを確保する (Figure 102、Figure 103、Figure 104 を参照)。
コンピュータの電源を入れ、 Dino-Lite とバックライトベースの両方を USB ポートでコンピュータに接続する。
お使いのメーカーやモデルの取扱説明書に従って、 ライトボックスの電源を入れる。
DinoCapture ソフトウェア(バージョン 2 または 3)を開き、 以下を行う:
- Dino-Lite LED ライトをオフにする。
- 自動露出機能をオフにする (Figure 105)。
- シャッター速度を 1/15 から 1/60 の間で選択する。 これらの二つのシャッタースピードオプションを試すと、 ライトボックスが明るくなり、 種子の縁を露出しすぎずに均一な白い背景が得られる (Fig. 12)。
レンズの下の顕微鏡スライドを動かして、 焦点内の種子の数を最大にし、 必要に応じて明るさと焦点を調整する。
ソフトウェアのライブビューウィンドウで、カメラアイコンを押して撮影を行う (Figure 105)。
画像を保存するには、 左パネルの画像サムネイル上で右クリックし、 save as (名前を付けて保存) を選択する。 Imprint (インプリント) セクションのチェックマークをすべて外し、 最大画像サイズと dpi を選択する。 画像を .jpeg 形式で保存する。
ファイル名には、 採集に関するすべての重要な情報(種子名、 採集番号または受入番号、 複製番号 (該当する場合)) が含まれていることを確認し、 情報が失われないようにバックアップを作成しておく。
参考資料
Seed viability testing using the Tetrazolium Chloride stain (Draft) - Millennium Seed Bank, Standard Operating Procedures 2.2
Methodology for epiphytic orchid seed viability test using Triphenyl Tetrazolium Chloride (TZ) - Millennium Seed Bank, Standard Operating Procedures 2.21
Sigma’s 2,3,5-Triphenyltetrazolium chloride Safety Data Sheet | SDS
:::